how to: my third (and final?) waistband tutorial

20140426-132951.jpg

It’s that time of year again. Spring. When leggings from last Fall are too short, but it’s not warm enough to pair them with sandals and call them capris.

My daughter is a size 7/8 waist and a 9/10 inseam. It’s so annoying.

To the casual observer, it might seem I’m obsessed with waistbands. I’ve already written two tutorials on the subject: taking in the waist on jeans and adding adjustable elastic. But what about comfy pants and leggings? That, my friends, is super easy.

Materials
elastic
small, sharp pair of scissors
pin, needle and thread

Step 1
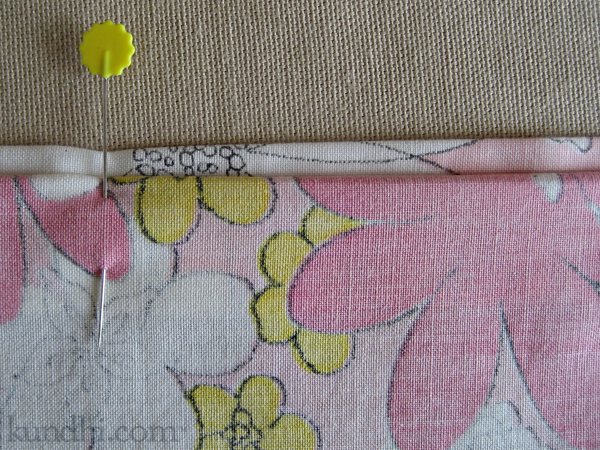
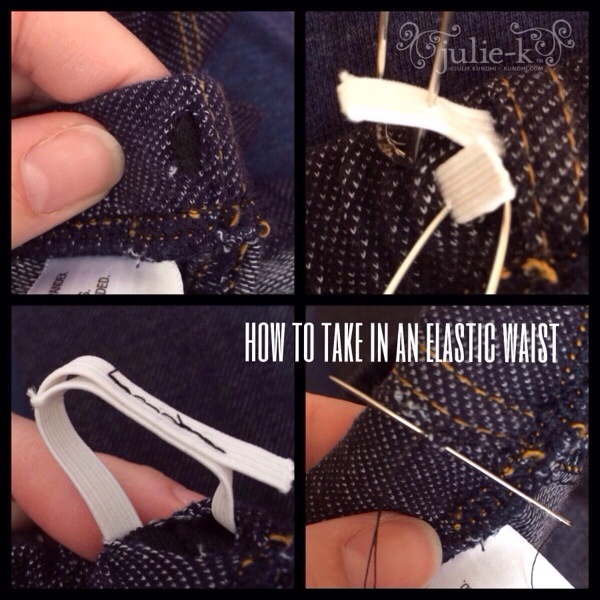
If you can find a seam, grab a seam ripper to open up the waist. So far I haven’t been able to do this. A lot of times the elastic is actually sewn to the fabric. Find an inconspicuous spot and snip a hole.

Step 2
Measure your/your child’s waist size and cut an elastic the same length. Thread it through the casing right along with the original elastic.

Step 3
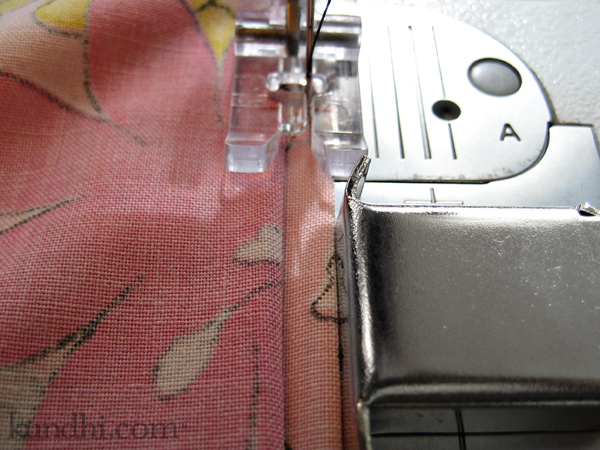
Overlap the ends about an inch and stitch together—by machine if you’re too lazy to sew by hand, by hand if you’re too lazy to get out your machine.

Now would be a good time to try on and make sure all is good.

Step 4
Stitch up the little hole you made in Step 1. I used to just add a few drops of Fray Check on the raw ends, but my daughter says it’s too itchy.

I’ll be assembly lining a bunch of these tonight. Happy Spring!

knitting fair isle for marriage equality

marriage equality pin

If you spend time on Facebook and Twitter, you’ve probably noticed a lot of red squares with pink equal signs. It is a way for people to show their support for marriage equality. I wanted to do more than just change my social media avatars, so I knit up a little pin.

I don’t often knit with two colors, and I tried this a few different ways. Intarsia was easier, but too many ends to fiddle with. Duplicate stitch over a red square looked just ok. I even tried crochet, but the lines just weren’t straight enough. Fair isle won out in the end.

I’m offering the chart with the disclaimer that when it comes to fair isle, I really don’t know what I’m doing. Even though I checked my gauge and made a chart, my first few tries came out more rectangular. I wound up adding a row of red to the top and bottom to even things out. Blocking into shape was also a must.

notes: Red yarn was Lion Brand wool. Pink yarn was a random soft acrylic from my odds and ends bin. I used size five needles. Finished size is 2 x 1 3/4 inches. I also found some great video tutorials that helped me out.

How to Knit Fair Isle with Two Hands
How to Knit Fair Isle Neatly in Purl
How to Carry the Yarn Across the Row

Also, here is a site where you can generate and print graph paper according to your gauge.

how to create silhouette clip art in 3 easy steps

20121113-084307.jpg

When I was playing around with my TKD Girl idea, I grabbed an image off the Internet to mock up some ideas. Once I realized I was actually going to do something with it, I needed to create artwork of my own.

Making silhouettes isn’t hard. In fact, technology has made it much easier than when I first started my career in graphic design.

1. Find an image.
That used to mean heading to the library and photocopying something out of a book. Now you can just print something off of the Internet.

2. Trace the image.

I like to start with pencil. I trace around the important details while adding some of my own (see the long hair above). Then I outline the edges with a fine point sharpie and fill in the rest with a regular sharpie.

3. Scan and clean up the image.

Before programs like Illustrator, I used to fine tune my images with opaque paint. The elbow that looks awkward? Paint over it with white, let dry, try again with black. Now I just scan my drawing into the computer and edit the vector artwork.

The upside of silhouettes is that you don’t have to worry about details like drawing a face. Without the context of clothing, however, the shape might look lumpy in the wrong places. I had to fiddle around with the outline of TKD Girl’s jacket so her shoulders, elbow and waist looked more balanced and natural.

See? Easy peasy lemon squeezy. Now go make some art!

tiny crochet flower pattern

I wanted to make some tiny crochet flowers last week, and figured I could just add a petal to my four leaf clover pattern. Five petals were too bulky, however, and they looked crowded. I reworked the petal a little bit and came up with these cuties. Happy Spring and enjoy the pattern!

tiny crochet flower pattern

Tiny Crochet Flower Pattern
worsted weight yarn
size F/5 (3.75mm) crochet hook
tapestry needle for weaving ends

dc: double crochet
hdc: half double crochet
sc: single crochet
sl st: slip stitch

gauge: not important, but my worsted weight flowers are about 1 1/2 inches across.
Note: The smaller flowers were made with a smaller hooks and different sock yarns.

Make a magic ring.
R1: chain 1, sc into loop 5 times, pull loop closed, join with sl st in first stitch
R2: continue in the first stitch with a hdc, dc, chain 1, dc, hdc; *sl st, hdc, dc, ch1, dc, hdc* in each of the four remaining stitches, finish with a sl st

. . . . . . . . . .

I’ve been trying to document my creative projects at least once a day using Instagram. It automatically posts my pictures to twitter, facebook, flickr and my rss feed. If only it could update the blog! Anyway, if you are on any of these platforms, stop by and say hello!

pattern: crochet troll doll dress

I’ve had this little troll for almost 20 years. She’s worn a Tae Kwon Do uniform for most of that time. I’m not sure exactly when my daughter decided the troll was hers. Isn’t it funny how kids kind of take over your things without you realizing it?

troll dress crochet pattern

The other night my daughter announced that she was naming the troll Isabel. Apparently, Isabel has grown tired of her Tae Kwon Do uniform and asked for a dress. Could I make one?

I thought there might be some other trolls out there who’d like a dress, so I’m sharing the pattern. It may seem big while you are making it, but remember it has to fit over those cute, chubby feet.

Pattern is written for the four-inch size troll doll.

Materials
sport or dk weight yarn (yarn was from my stash and is 12 wpi)
size F/5 (3.75 mm) crochet hook
small button
needle and thread for sewing button
tapestry needle for weaving ends

gauge: 4 stitches per inch

ch: chain
hdc: half double crochet
hdcDecrease: half double crochet decrease
sl st: slip stitch

half double crochet decrease: yarn over, hook through stitch, yarn over, pull through stitch, yarn over again, hook through next stitch, yarn over, pull through stitch, yarn over one more time, pull through all five loops

  • ch 32, join with sl st in back loop* of first chain to make a circle
  • ch 2, skip next stitch, hdc around in back loops* of chain, join in the round with a sl st in the top chain – 32 stitches
  • ch 2, skip next stitch, [hdc 6, hdcDecrease] around, join in the round with a sl st in the top chain – 28 stitches
  • ch 2, skip next stitch, [hdc 5, hdcDecrease] around, join in the round with a sl st in the top chain – 24 stitches
  • ch 2, skip next stitch, [hdc 4, hdcDecrease] around, join in the round with a sl st in the top chain, break yarn – 20 stitches
  • find the front six stitches of the dress, join yarn, chain 2, hdc next five stitches, turn work
  • ch 2, hdc next five stitches, do not break yarn
  • sew on the button and put the dress on the troll

troll dress crochet pattern

The next step depends on how tightly you chain and the size of your button. Chain 20 stitches or however many you need to make the strap go from one side, around the back of the neck, to the front and around the button. Break yarn and use the tapestry needle to thread the end a few stitches back to make the button loop.

Weave in ends.

*Go into the bumps on the back of the chain, not the stitches on the front of the chain.

recycle: how to make felted beads from yarn scraps

I’m going to say something silly, but I’m sure there are others out there feel the same. I have a hard time throwing out wool scraps. I don’t feel the same about cotton or acrylic yarn and I’m not sure why. There’s just something about the wooly ends. It pains me to toss them.

One night after amassing a large pile of granny square ends, I had an idea. I pulled the plies apart, walked over to the sink where my husband was doing dishes, and doused them with hot water. I added a tiny drop of soap and started rolling them in my hands. Within seconds I had the most adorable little felted bead! Just recently, I made some while the camera was out, and decided to take a few pics for the blog.

How to Make Felted Beads

1. Collect your wool ends. Here are a few from recent projects.

how to make felted beads from leftover wool yarn

2. Separate the plies. Skip this step with single ply yarn.

how to make felted beads from leftover wool yarn

3. Pull apart the individual plies until you’ve got a fluffy ball of wool. The fluffier the ball, the more even it will felt.

how to make felted beads from leftover wool yarn

4. Felt them by hand. Sometimes I use hot water from the tap. Other times I heat a small mug of water in the microwave. Get the wool wet and then squeeze out the excess water. Roll the wool between your palms until it starts to felt. Sometimes a little bit of soap helps get the process going.

Rinse out the soap and you’re left with these little cuties:

how to make felted beads from leftover wool yarn

I have great ideas for these, but I must admit that they are currently in a jar with a rainbow of other colors. I’d like to make a bracelet or necklace with them. I’d also like to use one as a center for a crochet flower hair tie. In the meantime, I just keep felting and collecting, happy that I’ve found a use for my wooly ends.

What do you do with your yarn scraps?

thanksgiving thumbkin pumpkins

It never fails. Whenever I make pumpkin pie, I always have a little bit of squash and pie crust dough left over. I save the squash for muffins, but there’s not much I can do with the dough.

This year my daughter suggested we make thumbkin pumpkins with the leftover ingredients. She made them in school earlier this week and thinks they’re the perfect excuse for eating lots of whipped cream.

We rolled up the leftover dough and divided it into several 1-inch-sized balls. Then she took her thumb and made a little well in the middle.

thumpkin pumpkin recipe

Since I start with plain pumpkin and not pumpkin pie filling, I had to add some sugar and spice to my squash:

1/2 cup pureed pumpkin
2 1/2 T brown sugar
1/4 t ground cinnamon
1/4 t ground ginger
small pinch of ground cloves

thumpkin pumpkin recipe

We spooned a small amount of squash into the thumb imprints. Then we baked these on a foil-lined cookie sheet along with the pie.

thumpkin pumpkin recipe

They turned out great. Personally, I’d add more pumpkin, but I’ve got a whole pie. These are really for my daughter, so as long as she’s happy, I’m happy. She ate them with a very generous dollop of whipped cream.

halloween crochet fun!

Halloween is in just a few days. Do you need a quick, fun and spooky crochet project? Here are some of my favorites.

crochet pumpkin amigurumi

julie-k tiny crochet pumpkin

crochet spider amigurumi

julie-k tiny crochet spider

glow in the dark ghost

julie-k glow-in-the-dark ghost

undead dolls

undead gang from Creepy Cute Crochet

Are you making anything for Halloween? Share in the comments!

how to: sew a reusable filter for cold brewed coffee

how to make an cold brewed coffee toddy filter

When I first moved to Lincoln, it was a no-Starbucks town. As I explored the local coffee shops for my daily iced latte, one of them recommended an iced toddy. It was love at first sip.

If you’ve never had cold brewed coffee, let me tell you it’s the most amazing thing ever. It’s less acidic than the hot stuff and therefore easier on your stomach. It also has a subtle sweetness that’s just about perfect, and I say that as someone who cringes at the thought of adding sweetner to a cup of joe.

I immediately purchased a Toddy Coffee Maker so I could make decaf at home and drink it all day long. That’s only a slight exaggeration. My only frustration was the darn filter. They’re supposed to last a few months in the fridge, but mine were only making it through 2-3 brews. Then one day, the Pioneer Woman posted her recipe for The Perfect Iced Coffee and a lightbulb went off. I could make my own reusable filter!

how to make an cold brewed coffee toddy filter

Here’s how I did it:

  1. Grab a tea towel, the thinner the better.
  2. Fold in half and trace the top of the toddy maker as your pattern.
  3. Cut through both layers of the towel to get two circles.
  4. Sew circles together right sides facing, leaving a gap for turning.
  5. Turn right side out, tops titch around to close up the gap.

I’ve used this a few times and it works great. I just rinse off the grinds and throw it in the wash. If you cold brew at home, quit buying filters and make your own!

project details: I used the tea towels from my failed attempt at coffee grind dyeing, and yes, they’re still blue. I bought my toddy online, but a lot of local coffee shops carry them. Buy local if you can. Here is Ree’s recipe for the Perfect Iced Coffee. Note: I just use coffee and almond milk, but her concoctions sound sinfully delicious.

This is not a product endorsement or paid review. The Toddy folks have no idea who I am. I just love cold brewed coffee and dislike buying disposable filters.

how to: blind hem stitch without a special foot

Last week I had to hem a pair of pants and I was so excited to use the blind hem stitch for the first time. I checked out a few online tutorials and everyone started out with the same thing: you’ll need a blind hem foot, switch to your blind hem presser foot, first you’ll need a blind hem foot that has a guide.

Huh? When the women demo’d the blind hem stitch to me on my machine, she did not use a different foot. So, I did a little bit of experimenting with some practice fabric. Here’s the hem.

blind hem without a blind hem foot

Here it is folded back. I pinned it in place.

blind hem without a blind hem foot

I did some practice stitches to figure out where the fold should be positioned for the best result. I used a magnetic seam guide to mark the best position. Painter’s tape would work just as well.

blind hem without a blind hem foot

What you want is for the hem stitch to just barely catch the fabric…

blind hem without a blind hem foot

…so when you look at the right side, the stitches are small little dots. When you use matching thread, they’ll become practically invisible.

blind hem without a blind hem foot

And that’s it! No special foot needed. I took a picture of my guide position for future reference. You could write it in your manual or just leave the painter’s tape on your machine if you are going to do a lot of hemming.

resources: This video does a good job of showing how to fold your fabric before hemming. This is a great tutorial for hand-stitching a blind hem, which is a nice alternative if you are in the mood for a little bit of hand work.