is it really thursday already?

I’ve been incredibly productive the past few days, especially considering that I’ve been sick. In addition to my new website, I’ve been working on a website design for my friends’ new business. The only thing left on my to-do list is to get some Easter pics posted before the end of the week.

But first, I’ve posted a review of Crafty Chica’s Guide to Artful Sewing: Fabu-Low-Sew Projects for the Everyday Crafter over at julie-k.

Now I’m off to a coffee date. I’ll try to get those Easter pics posted later today!

book review:
crafty chica’s guide to artful sewing

I’ve found a lot of wonderful, crafty women through twitter, one of whom is Kathy Cano-Murillo, a.k.a. The Crafty Chica. When Kathy tweeted that she was looking for bloggers to review her new sewing book, I jumped at the chance.

crafty chica

Crafty Chica’s Guide to Artful Sewing: Fabu-Low-Sew Projects for the Everyday Crafter is a great beginner sewing book. Kathy’s writing is down to earth and her personality shines through in her projects. You don’t have to love glitter to find inspiration within the pages.

If you’ve never sewn before, Kathy gives you a good, basic overview of threading and using your machine. She covers types of fabric, embellishments and designing your own material. She also differentiates between “must-have” and “luxury” supplies. Advanced sewists will enjoy this part of the book, too. It’s sprinkled with tips, tricks and fun anecdotes.

This is definitely an “artful” sewing book. The patterns are easy, but not boring. I’ll admit I pulled out my box of buttons and ribbons after reading through it the first time. There are also ideas for upcycling and recycling. Some of my favorite projects are:

• sending fabric postcards
• using vintage scarves for a dress
• updating a skirt with ribbons
• embellishing a coat with trim
• making a t-shirt and yarn scarf

These projects will have to wait in line, though. I have a few projects that have been sitting in my to-do pile waiting for some inspiration.

crafty chica

Beach Towel Tote: I saved some scraps from a beach towel that had my name embroidered on it. It’s not enough for a tote, but it would make a cool zipper pouch for sunglasses, sunscreen and a book. I just need to pick out some ribbon and buttons to jazz it up a bit.

crafty chica

T-Shirt Glitter Tote: I’ve wanted to turn one of my ’80s Siouxsie shirts into a tote for awhile now, but wanted something that wasn’t floppy. I can’t believe I never thought of just stitching it to an existing canvas tote. Duh! I may even add glitter.

crafty chica

Bohemian Bed Cover: I have some beautiful embroidered blankets from my in-laws that need to get out of the closet and on display. They aren’t big enough for our bed, so I’m going to add some more fabric. T doesn’t share my creative vision on this one, but I think they will look great!

Bottom line: I recommend this book for any level sewist, especially if those looking for some artistic inspiration.

i have a new blog!

It’s been almost a year since the lincoln blog turned into julie-bird and a lot has changed for me. I’ve become very interested in reusing and recycling textiles, almost to the point where I want to talk about it all the time.

I’ve reached a little blog dilemma: the more I blog about crafts the more I worry about boring everyone who comes here for family pics. Plus, more and more people are coming here for the craft stuff, and I don’t want to bore them with family pics. (Ok, I’m sure no one ever minds seeing pics of Bella, but you know what I mean!)

julie k

So, I’ve decided to start a new blog, julie-k, just for chatting away about making things out of recycled textiles. Mostly, I’m going to be logging my projects — success and failures — and highlighting my favorite tutorials, techniques and inspirations.

I’ve got some other ideas, too, but not enough time to get to them all right now. Like most things in my life, it’s a work in progress. I figured if I wait until it’s all I want it to be it will never get off the ground! So, all of the crafty peeps who follow julie-bird, I hope you’ll join me over at julie-k for more crafty fun! Here’s a direct link to julie-k’s rss.

Don’t worry, friends and family. I’m not making any changes to julie-bird. I hope to write more about our daily lives and the fun we’re having out here in the Heartland. Oh, and plugging my new blog, of course.

recycle plastic easter eggs into music shakers

plastic eggs

A few months ago, I signed Bella up for music class. It was a very basic introduction to different kinds of music and dance. One of the activities was making a shaker egg. The kids had so much fun with them that I decided to make a bunch more with our leftover plastic Easter eggs.

shakers

I dug through the pantry and my craft supplies to get a range of items that would make different sounds: rice, lentils, chick peas, buttons, beads and bells. I put a teaspoon of each item in a separate egg. I applied crazy glue to the inside edge of the egg and snapped it shut. Then I wiped the excess off the outside of the egg and let it dry overnight. I made enough for Bella and her friends and sewed up some cotton bags stamped with each child’s name.

egg bags

I learned the hard way that you really need a super, duper bonding glue for these. My first attempt was a non-toxic plastic model cement. It didn’t keep the eggs shut, so I opted for the heavy duty crazy glue instead.

These are great for kids ages three and up. If they eggs do come open (say, perhaps, if a toddler were to step on one, ahem) the inside items could be a choking hazard.

reuse: Instead of throwing out little containers that aren’t recyclable, turn them into something musical and fun.

how to refashion an ’80s sweater
in five easy steps

UPDATE: Thanks to the Craft Magazine blog for their link to my tutorial!

March is Mending Month over at Craftzine. I’ve been doing a lot of mending lately. I keep a bag next to my desk for whenever I have a little time for sewing a button or fixing a hem. Mending is good for the soul, at least mine anyway.

Last week I posted a scarf I made out of sweater scraps from resizing my brother-in-law’s ’80s style sweaters. It was super easy. I probably wouldn’t try this with an heirloom sweater, but it’s great for all those oversized sweaters you may have collecting dust in the back of your closet.

Step 1
Try on the sweater inside out and pin along the sides and under the arms for a more fitted shape. (I used safety pins for this step.)

Step 2
Lay the sweater flat and adjust the pins make sure your seams are straight and equal in size. (I changed to straight pins at this point.)

sweater tutorial

Step 3
Machine stitch the new side seams with a straight stitch. Then repeat with zigzag stitch to catch the frayed ends. (A serger would be perfect for this.)

sweater tutorial

Step 4
Your seams might be a little wobbly after stitching. Press with a warm steam iron. Use a press cloth if your sweater isn’t 100% wool. Trim excess.

sweater tutorial

Step 5
Turn sweater right side out and press open the seams. That’s it!

sweater tutorial

refashion: Extend the life of your clothes by resizing baggy pieces with a more modern fit.

remote control pillow pattern

from the julie-bird.com archives

UPDATE: Thanks to WhipUp for their link to my pattern!

When it comes to gift giving, it’s really hard to buy for my brother. Same with his girlfriend. They don’t have a lot of time for hobbies because they both work really hard at their jobs and at school. The only thing that is consistent with them is the Hokies. Something burgundy and orange usually goes over well, but how much VT gear can one really want? I decided to ask him. I told him to be honest. Do they both really love the Hokies that much? The answer was YES. So for his birthday, I made him this:

easy remote pillow pattern front

And that’s not even the cool part. Look at the other side:

easy remote pillow pattern front

Because they are so busy with work and school, they wind up watching more games in their living room than down in Blacksburg. I figured a VT-themed remote control pillow would be perfect! What’s even better, I made this out of one of his old VT sweatshirts. He had handed it down to me a few years ago and it had been sitting in my closet for awhile. I figured I’d give it back to him new and improved!

I think this would be a cool gift to make for any sports junkie in your life. It would probably work just as well with a t-shirt. I’d just use a more substantial interfacing to give it structure. I’ve written up a pattern and you can download it here. Let me know if you make one! And as always, drop me a line if you have any questions.

recycle: Use clothing instead of new fabric to make one of a kind creations.

easy kids shorts pattern

from the julie-bird.com archives

UPDATE: Thanks to the Craft Magazine blog for their link to my pattern!

I’ll say right up front, this isn’t an original idea. There are lots of tutorials on the web on how to make kids pants, like here and here. There’s also a cool how-to in The Creative Family.

I also need to note that my daughter really doesn’t need any more pants. She has plenty, and it’s too hot to wear them now anyway. So, I did the next best thing. I made her shorts! (Shhh… she has plenty of shorts, too. I just really wanted to sew these and was looking for an excuse!)

easy kid shorts

They turned out nice. The t-shirt fabric is from one of my old Gap shirts that has a little stretch to it. I didn’t make them too snug, and hopefully they’ll last through the rest of the season.

easy toddler shorts

I used a pair of her shorts as my pattern and traced them onto paper first. The template fits on an 8.5 x 11 piece of paper, so I figured why not share it with the blog world? You can download it here.

Drop me a line and let me know if you make a pair. I’d love to see a photo if you do! Also, this is my first attempt at writing a sewing pattern. Please let me know if something isn’t clear!

recycle: Use large t-shirts instead of new fabric to make soft, comfy kids clothing.

mini santa hat pattern!

from the julie-bird.com archives

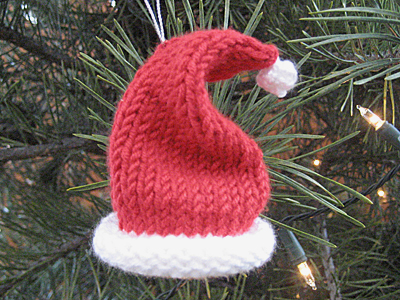
Last year I tried knitting a little stocking for our knitting group’s ornament exchange and it turned out really wonky. The night before the exchange, I whipped up this little Santa hat instead.

santa hat

For this year’s exchange, I knit the stocking from Last Minute Knitted Gifts and it turned out MUCH better. Tana, who picked my Santa hat from last year, picked the stocking this year. I knit them both out of the same yarn. Too funny! I should see if I can complete her set with a mini sweater next season.

I’ve been thinking a lot about the little Santa hat ornament. It was so cute and easy! So the other night I decided to knit another one for our tree. I love it so much! Here’s the pattern so you can knit up some cuteness for your tree.

Knitted Santa Hat Ornament

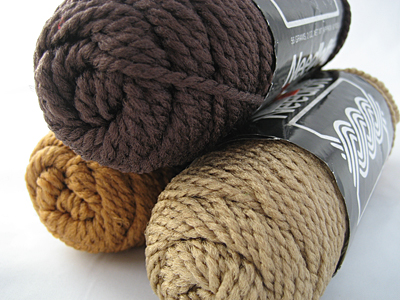
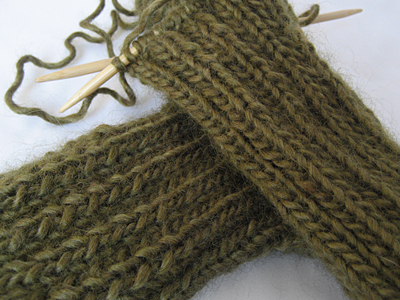
Yarn: Lion Brand Micro Spun colors red and white
Needles: I used size 3 dpns
Gauge: 6 stitches = 1 inch
Time to complete: Less than two episodes of the Sopranos.

Hat

Using white yarn, cast on 30 stitches and divide evenly over 3 dpns.
Join and knit 8 rows in white (add rows if you need to so it forms a nice roll brim).
Change to red yarn and knit 12 rows.

Begin decreases:
Knit the first two stitches on each needle together.
Knit a plain round.

Repeat these two rows until you only have 3 stitches left. Tie them off.

Pom Pom

Start with a slip knot of white yarn on a single needle.
Knit in the front and back of the stitch, increasing to 2 stitches.
Knit in the front and back of both stitches, increasing to 4 stitches.
Repeat once more for a total of 8 stitches.

Begin decreases:
Knit two together across, decreasing to 4 stitches.
Repeat, decreasing to 2 stitches.
Repeat once more and tie off.

Pull the two ends together and shape a little ball. With a darning needle, thread the ends through the top of the hat and tie a knot.

If you want your hat to hang straight, string it up from the top. If you want it to have a little curl, like mine, string it up from the middle.

Hang on the tree and admire your craftiness. Merry Christmas!

reuse: Don’t let all of those tiny balls of leftover yarn go to waste. Use them for small projects like tree ornaments.

fabulous finds

Last Saturday I tore through my stash. I weeded out fabric, notions, yarn, felt scraps, and project ideas that no longer inspired me. I also dug through my closet and got rid of any clothes that no longer fit or were too worn to save.

I feel like I am starting with a clean slate. I’m excited about what I have and know what I don’t need to buy on my thrift store excursions. I also know what I don’t have and can take advantage of super deals without wondering, “Do I really need this?”

I found some really great things on my last trip to Goodwill and have to share. First up, buttons! There were tons of these little grab bags and I had to dig around to find one that I really liked. All of these for $4. I love them! A lot of them are the perfect size for brightening up some of my existing shirts.

buttons

I’ve also been meaning to make some scrubbies, but couldn’t bring myself to spend $5 for a ball of nylon yarn just for scrubbies. I had been waiting for a 40% off coupon, but then I found these for $1 a ball. They had a ton and I exercised serious constraint buying only three.

crochet nylon

And finally, I’ve been wanting to make Bella a little tutu. I was thinking of something like Zoe’s, but she really likes Abby Cadabby and I was thinking about using some purples and blues, too. How awesome was this find?

tulle

I don’t know what I’ll do with the extra. There are four yards of each! For $2, though, I couldn’t pass them up. The colors are perfect!

Goodwill is having its 99 cent sale on Easter Sunday. It’s awfully tempting. I might sneak out for a little stroll by myself, even if it is a holiday.

i forgot the combination

These wrist warmers are knit in the round until you get to the thumb. You go back and forth until the thumb is finished and then go back to knitting in the round. As you can see on the left, I was having issues with the thumb section and I couldn’t figure out why.

wrist warmers

A little back story: When I do ribbing in the round, I knit continental and purl combination. I don’t know why. It just seems easier to me. When I’m going around and around, it doesn’t matter. What I failed to remember is that when I go back and forth, my stitches are twisted. Doh!

So, both wrist warmers were finished, but in the back of my mind they were bugging me. I don’t remember exactly when I realized my mistake. It was probably in the shower. Isn’t that where all of our a-ha moments occur? Last night I ripped back to the beginning of the thumb and paid closer attention to the orientation of my stitches. The fixed one is on the right.

Now that I’ve figured it out, I feel kind of dumb.