drop spindles handmade by my husband

handmade drop spindle

First off: No, I am not starting another hobby! I’ve been thinking of plying some of my lighter weight sweater yarn to make a worsted weight. I looked at a few drop spindles online, but it seemed like such a silly thing to spend money on when I didn’t even know if it would work.

I thought maybe I could make a DIY spindle to try it out and if I had good luck, maybe I’d buy one. On Saturday, I asked my husband if he would pick up a wooden door pull for me. I already had some dowels and hooks. When I showed him what I was planning to do he said, “Give me a few minutes,” and headed to the garage.

handmade drop spindle

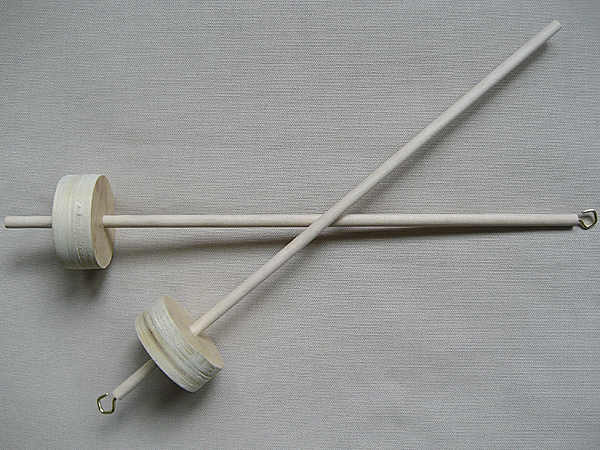
Within 15 minutes I had two drop spindles — a top and a bottom whorl. He used a drill hole saw, which worked perfectly. Aren’t crafty husbands great? (I doubt he’d consider himself crafty, but I think he is!)

I played around with them a little bit over the weekend and I think plying the sweater yarn might actually work! I hope to do another post soon with examples.

project details: The inspiration for these came from the one Abby Franquemont uses in her Drop Spindle Basics video.

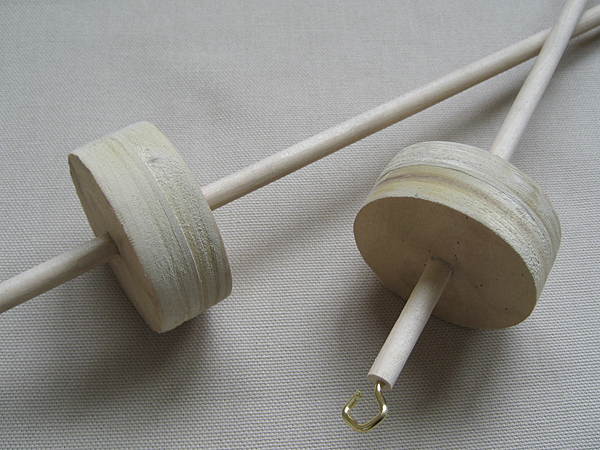
Here are the specs: My husband used a 2 1/8 inch hole saw with a 3/8 inch mandrel. That gave him a 2 inch circle that fit my 1/4 inch dowels. The original wood was a 1 x 3 x 6 inch piece of poplar. He smoothed the edges with a file and sandpaper. If you have any questions, put them in the comments and I’ll get him to reply.

dressy bessy!

dressy bessy

Did you have a Dressy Bessy (or Dapper Dan?) when you were little? I did and I loved her! My daughter is learning to button/snap/tie and I really wanted to get her one. However, the dolls from the last few decades look very different than the one I had. This one isn’t so bad. I don’t even recognize this one!

Here is the Dressy Bessy I had. I’ve been searching on ebay for the past few months and these girls are hard to come by in nice condition. (New in the box went for $84!) Then I started to see dolls like the one above. She looks like the doll I remember, but doesn’t have the vinyl shoes and vest. I figured I could live without them if I could get something similar and clean.

I was so happy to win her! I’m also happy that my daughter likes her, although she’s not a fan of the buttons and snaps. I guess she’s officially a member of the Velcro generation. I’m going to keep working on her, though. Sooner or later she’s got to learn how to button/snap her own pants!

Do you have a favorite doll or toy from your past that you really wanted for your kids? When you gave it to them, they like it as much as you did?

mother’s day idea: how to make a photo frame applique in 3 easy steps

photo frame applique tutorial

A few years ago, my mother gave me a little photo frame change purse. I had been using it for knitting bits and bobs, but it’s kind of small. I decided to make a bigger one for myself.

This applique will add a great touch to any Mother’s Day gift. I love mine!

Materials
photo: 2 1/2 x 3 1/2 inches
plastic: 3 x 4 inches
bias tape (or make your own)
heavy duty sewing needle

photo frame applique tutorial

I used the packaging from a set of sheets for my plastic. The same kind of packaging is used for blankets, comforters, tablecloths and shower curtains. (Don’t forget to save the zipper, too!)

photo frame applique tutorial

Step 1
Stitch the bias trim to your plastic (A). Here’s a great video on how to miter your corners.

Step 2
You’ll only be stitching three sides of the applique to your fabric because you need an opening to slip in the photo. Top stitch the fourth side so it will match the others when you are finished (B).

Step 3
Position your applique on the fabric and stitch the remaining three sides in place (C). Make sure you don’t pin it through the plastic! Pin through the fabric trim instead.

Obviously it’s easier to add this to a work in progress while your piece is still flat, but you can stitch this to already made items, too.

Try other sizes like a 5×7 on a small bag or even a 8×10 on a large tote. Simply add the width of your bias tape to your photo dimensions to get the size for your plastic. Make sure you adjust the length of your trim and add 1-2 inches for overlap.

photo frame applique tutorial

project details: Zipper, upholstery and lining fabric all thrifted. Sheet packaging from my linen closet. I always save the ones with zippers because they make great storage for yarn and fabric.

my creative space

my creative space

I have this vision of my creative space. In it, there are no piles for my daughter to dig through asking, “Mama, can I use this fabric for a picnic bundle?” She won’t make off with buttons or ribbon from my desk. She definitely won’t be checking out sharp, shiny, pointy objects.

This room doesn’t have a lot of storage space because we sacrificed most of the closet for an angled entry with a french door. Ah, yes. The french door that exposes my works in progress to the rest of the house.

I started this project back in March with a major destash. Since then I’ve been doing little bits in the evenings. Yesterday I got a surge of energy and made some real progress. It took all day. I recycled, donated, rearranged, decluttered and reorganized.

My vision? I think I’m almost there.

test driving curtain fabric

sweater unravel crochet blanket

I haven’t been very successful at getting up early to have some creative time for myself. However, I am up early enough to know that my creative space is too warm for coffee and work in the morning. This big, beautiful window faces east. Not only does it heat things up, but it puts a glare on my laptop screen. Curtains are a must.

I love my view and was happy to find this nice muslin in my stash. I hung it up while my daughter was in school this morning and it immediately cooled the room down. You can’t see through it with the sun beaming, but after Noon, I had my view back! The big question comes tomorrow morning. Is it opaque enough to keep my creative space cool so I can enjoy my morning coffee while I work? I hope so!

stash: I bought a brand new bolt of this at a garage sale last year for a few bucks. It was still in the kraft paper wrapping! I have a feeling a few more rooms in my house will be getting curtains in the coming weeks.

recycling a sweater directly into a blanket

Toward the end of last week, I wasn’t feeling very inspired. Maybe it was the high pollen count? Maybe it was the non-stop conversation with my three-year-old? Maybe I just needed a little creative break? I decided a few days on crafty autopilot would be good for me, so I grabbed a sweater and started unraveling.

sweater unravel crochet blanket

Since I only unravel when my “helpful” daughter isn’t around, I still have some of the original sweater to show you. This is one of my trade sweaters. I usually don’t mess with acrylic, but this sweater was so pretty and soft. Plus, it’s super bulky weight yarn and it’s working up fast.

sweater unravel crochet blanket

I’m crocheting a petite afghan with a simple granny square pattern. The yarn is even more lovely after being unraveled. The kinks are falling out as I crochet, so I’ve eliminated that whole soaking and drying step. I’m curious to see just how big it will get.

Has anyone ever gone from sweater to blanket? How did it work up for you?

recycle: I wonder how many people we could keep warm if we turned all of the sweaters destined for the landfill into comfy blankets?

first farmers’ market of the season

bella's at the farmers market

May Day was a perfect day for the first Farmers’ Market of the season. We bought a small tomato and a small cucumber plant from our favorite vendor. We also got a big bunch of the most amazing asparagus.

steel drum band farmers market

Bella listened to the steel drum band and shared her first lemonade with her Dad. We’re looking forward to many more Saturday mornings like this one!

cool birthday gift idea for boys

I was at the bookstore the other night and found a book called How to Draw Cool Cars.* These weren’t your average cool cars, but super fast ones like Ferrari, Alfa Romeo, Maserati, Lamborghini — you get the idea. I had never seen anything like it and knew I needed to get it for Wyatt’s ninth birthday.

A few years ago I made a bunch of crayon rolls, including one for Wyatt with car fabric. You can’t really draw a Lamborghini with crayon, though. It just doesn’t seem right. So, I made him a much more grown-up colored pencil roll.

felt pencil roll

I have this really nice, thick wool felt that I got at a garage sale a few years ago. I never knew what to do with it, but it had Japanese characters printed on it with a sparkly gold ink. I knew I had to save it. I was so glad I did. It was perfect for this project!

felt pencil roll

I saved the printed part of the wool for myself. It will make a cool crochet hook roll, don’t you think?

stash: If you don’t have a use for a certain fabric right away, but it speaks to you somehow, I recommend keeping it in your stash. It might just be waiting for the perfect project to come along.

*I can’t find the exact book online, but this one looks similar.

upcycling in the kitchen

recycled towels

I’m finally getting around to some household stuff I’ve had in my to-do pile for awhile. Last year I made some rags out of an old bath towel, but I never finished the edges. They’d get frayed and messy in the wash and every few months I’d trim off the scraggly bits. Yesterday I finally switched my serger over to 2-thread overlock and cleaned up those edges. I also went ahead and cut up and finished another towel. This stash of rags should last awhile!

I also tried to make some tea towels out of a thrifted linen dress. The blend has too much nylon though, and they aren’t very absorbent. My husband suggested that they’d make great napkins. I’m so excited that he’s open to the idea of cloth napkins, because they are on my to-do list, as well. This project gave me a lot of practice with rolled hems. Oh, how I love my serger!

I hope to have some more household stuff to post soon, including curtains for my office!

reuse: Towel came from my linen closet, dress from 99 cent sale.