crochet flower pins in the shop

crochet flower brooch

I tried really hard to write about fabric gift bags last night, but it seems so trivial right now with everything that’s going on in the world. I’ve got a lot of nervous energy to burn. Today I finished a blanket and crocheted more flowers. I can’t stitch flowers to everything in my daughter’s wardrobe, so I made a few into pins. They are in my shop. A cute alternative to hearts for Valentine’s Day, don’t you think?

etsy: Red flower here, pink flower here.

how to make microwave crayon shapes in 3 easy steps

microwave heart crayons

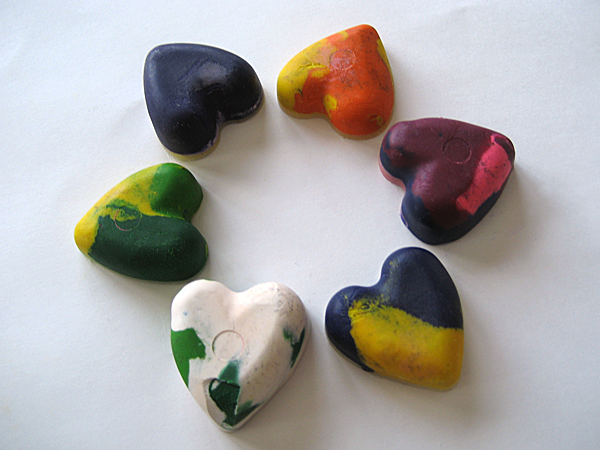
Maybe I should call these Really Lazy Crayon Shapes. I’d been thinking of making them for awhile, but all of the tutorials I found online suggested baking in the oven, melting over a double boiler or melting into cups and pouring into molds. Those were just too many steps for me.

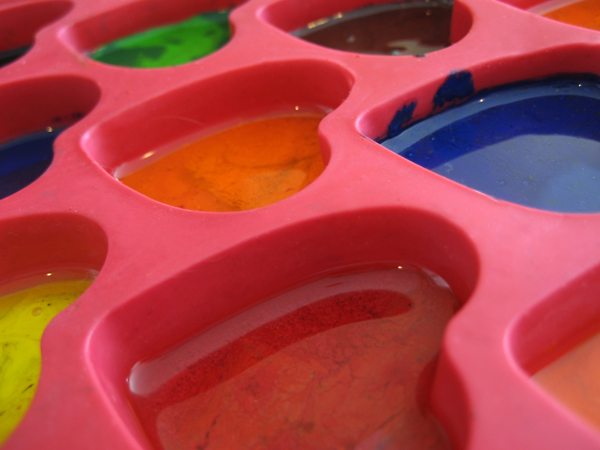
I found a silicone mold at the thrift shop for only a few bucks, so I wasn’t too concerned if I ruined it. I threw all caution to the wind and microwaved the crayons directly in the mold. It was simple, fast and easy to clean up.

microwave heart crayons

Materials
crayon bits
silicone mold
knife
toothpick

Step 1
Put your crayon bits directly in the mold. Break up any bits that are too big with a knife.

Step 2
Microwave on high for 1-2 minutes. (I’m sure times will vary based on microwaves. Watch your first batch carefully!) Use a toothpick to stir if your bits aren’t melting evenly.

Step 3
Allow to cool and then pop them out of the mold. I put mine outside because we’re having a frigid winter and it didn’t take long, but you could stick them in the freezer, too.

Clean up: Put some water in the mold, microwave it for about a minute and dump it out. The crayon residue wipes out easily with a paper towel.

*After searching, I found that my mold is actually an ice cube tray and shouldn’t be exposed to heat. It held up just fine, but I wouldn’t use it for ice cubes or food after heating just to be safe.

recycle: This is a great way to use all of those crayon bits that are too small for little hands to hold.

my first crochet hat

first crochet beanie

I’ve got too much acrylic yarn. I like to keep a stash on hand for spontaneous amigurumi projects, but it’s gotten out of hand. I was planning to give it away, but it’s been so cold out, I thought maybe I’d do something useful with it.

A few months ago, my friend Lisa asked all of her crafty friends if they would consider making some hats for students at her school who needed warm clothing for winter. I actually started one and then the holidays hit and I completely forgot about it.

As you probably know (unless you’ve been living under a very warm rock), it’s been pretty cold in Nebraska the past week. I’ve been thinking about the kids who usually walk to school. Then I remembered the hat I started.

I was surprised how fast this worked up. (I was also surprised that my daughter agreed to wear it for a photo.) I definitely plan to make a few more of these.

pattern: This is a basic double crochet beanie like this one. I modified it a bit as I went along. My yarn was sport weight, so I double stranded it and used a larger hook. It is thick and warm!

garden scarf

birthday garden scarf

Have I mentioned that I’m addicted to crochet flowers? I made this as a gift for a friend’s daughter and it was so much fun. What a perfect pattern for little girls. My daughter loves it! I think I’ll be making a lot of these this year.

handmade crochet flower scarf

I love these colors together, but I think it’s time to add some new colors to my stash of acrylic yarns.

project notes: Pattern is the Garden Scarf from The Happy Hooker. This book is a really great resource for crocheters, especially beginners. Thrifted yarn from my stash.

the flower appliqué experiment

My daughter is a little heater. She takes after her father, who wears shorts in the winter. She’s never cold. She just wants one small blanket when she sleeps and she refuses to wear sweaters.

hand knit sweater with crochet flower applique

Her Grandmom loves to knit her sweaters, the warmer the better. Every time we talk, she expresses concern over my daughter not wearing her sweaters. I’m not sure if it’s because she’s afraid our child is really cold or she’s disappointed that all of her hard work isn’t getting worn.

hand knit sweater with crochet flower applique

I decided to do a little experiment and crocheted a flower appliqué for her pink fuzzy sweater. My daughter LOVES the flower, but when I asked her if she wanted to wear the sweater, she said no. Meanwhile, I’m wearing a sweater and bundled up in a blanket by the fireplace. Just looking at her makes me cold! I’m going to keep trying, though.

hand knit sweater with crochet flower applique

The only pink yarn in my stash was wool, so I had to make the applique easy to remove for washing. I stitched the petals on with a large piece of yarn and tied a bow in the back. It will also be easy to move to other sweaters in the future.

flower details: Flower is an Irish rose and the middle is a vintage button.

new year pajamas

I finally got around to finishing up my daughter’s second pair of “Christmas” pajamas. We’re now calling them New Year Pajamas.

handmade pajamas

They are pink with little white flowers, but with the weather we’ve been having, my daughter has been calling them snowflakes. We’re supposed to get more snow tomorrow. I might let her were these all day long.

handmade pajamas

stash: I wish I could remember where I picked up this fabric. It’s so soft and thick. Nice and toasty for the chilly temps we’ve been having in The Heartland.

embroidered sun pillow

handmade embroidered sunshine pillow

A few months ago, my daughter was drawing at her easel while I was making dinner. She said, “Look, Mom! A sun!” Not only was it a sun, but it was her very first face, complete with two eyes, a nose and a smile. Since then, she’s drawn lots of suns with faces: fat ones, small ones, some even with freckles. This one is special, though. This one was the first.

handmade embroidered sunshine pillow

I decided to share her sun with her grandparents for Christmas. I took a photo of her original artwork, printed it and traced over it with a marker. Then I taped it to a window, taped the fabric over the paper, and traced it with disappearing ink. After embroidering it, I sewed it up into a pillow cover.

handmade embroidered sunshine pillow

I hope to make one for myself this year. Maybe a smaller version for her room? She loves her sun and has the printout taped to her wall. I’ve got the original tucked away for safe keeping.

stash: Everything except the pillow forms came from my stash. The upholstery fabric colors were perfect for this project and I used quite a bit of yellow embroidery thread.

my first handmade tie

Happy New Year! Here’s my very last project of 2009 — a men’s tie!

handmade men's tie

I was surprised how easy it was to make. This project was mostly hand sewn using the blind stitch. If you’re not a big fan of either, it might not be for you. I love the blind stitch and had a lot of fun making this. I know I’ll be making more in 2010 for the guys in my life.

handmade men's tie

project notes: Stash-enhancement fabric. Purl Bee pattern. There’s a little boy’s version, too. How cute!