adventures in sewing with faux leather

custom handmade faux leather bag

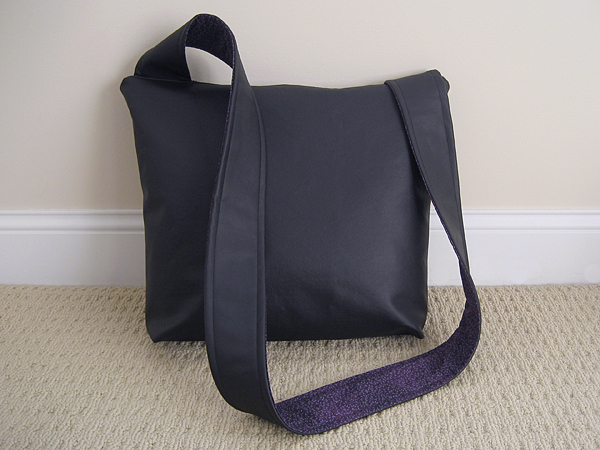
I know I say I’ll sew anything if it fits under my presser foot, but I’ll admit I was a little anxious when my friend asked me to make a zippered messenger bag out of faux leather. It was soft and thick and had a woven polyester backing. I decided to make small zipper pouch first to test it out. Here’s what I learned:

  • Folded faux leather creases and you can’t iron it. You can try using a press cloth, but it will warp.
  • Faux leather sews up nicely. I used a heavy duty needle that went through it like butter.
  • Corners are kind of tricky, especially the zipper corners. It was hard to get them square.
  • If you need to pin your pieces, do so in the seam allowance or you’ll have holes in your finished bag. Same goes for ripping seams. You’ll need to stitch exactly over the little holes to hide them.

The first thing I did was unfold the fabric and roll it up. When it was time for me to sew, most of the creases had disappeared.

Next I adjusted my usual messenger bag pattern to avoid some of the corner trickery. Instead of lining up the strap with the side seam, I moved it over about an inch on each side and sandwiched it between the outside fabric and the zipper.

custom handmade faux leather bag

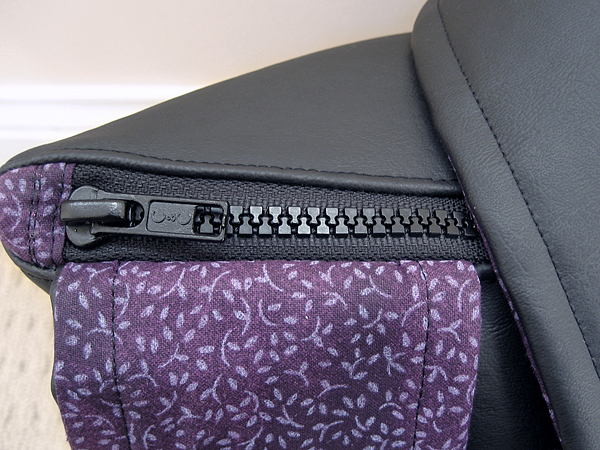
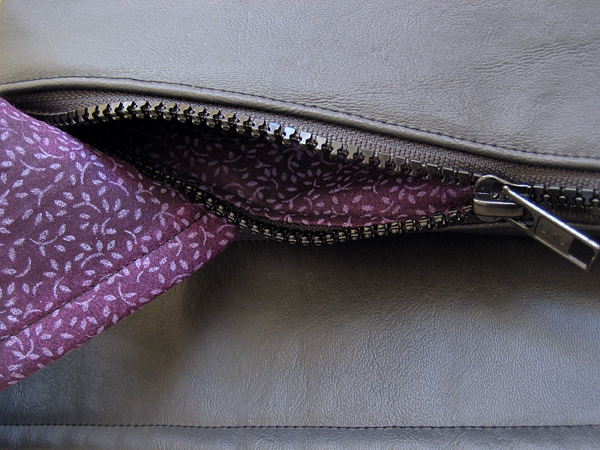
The zipper was also a challenge. Usually I just sew right over zippers, but this one was too thick. I covered the ends with some extra fabric, so when I went turned my corners right side out, they weren’t bulky.

Mostly importantly, I went slow and used paper clips to hold my pieces together. I did have to rip in two places, but managed to stitch over the little holes. I’m really pleased with how this sewed up. It was a cumbersome project to get through my presser foot, but the finished result looked fabulous. I especially love the top stitching detail.

custom handmade faux leather bag

review: This project has got me thinking about faux leather in general. I know that animal rights organizations prefer it, but what about our earth? Here’s what I’ve found so far:

Polyurethane is much more environmentally friendly in both production and after-care. PVC contains chloride and does not biodegrade. In landfills, it leaches toxic additives and when incinerated, it emits carcinogenic dioxin. Leather production is a chemical-laden process that uses heavy metals. Polyurethane is biodegradable and is designed to deteriorate after usage.

Read more at Brentano Fabrics

handmade, no-sew abby cadabby costume

abby cadabby sesame street

I hope that all of the handmade costumes in my future are as easy as this one. Remember the tulle I found at the thrift store awhile back? Even then I had a feeling it might make its way into an Abby Cadabby costume.

handmade abby cadabby costume

Tutu
I found both of these tutorials very helpful: how to make a ribbon tutu (video) and how to make an elastic tutu. The first one is totally no sew. The second one needs a little bit of hand sewing— you need to sew the ends of the elastic together. I made my strips 40 inches long, so folded and knotted they fell right above the ankle.

Magic Wand
I had never used a glue gun before and borrowed husband’s for this project. Why was I so intimidated by hot glue? It was so easy! I used this tutorial for the wand, and the wooden dowel was the only part of this costume that wasn’t from my stash.

Hair Poufs
These are just smaller versions of the pouf I made for the wand. I tied them to elastic hair bands.

Wings
I didn’t make wings. Actually, I don’t know if my daughter even realizes that Abby has wings. She is all about the magic wand. I figured they’d just get in the way, especially if she wore the costume all day, which she did.

Everything Else
The shirt, pants and shoes all came from my daughter’s closet. The trick or treat bag is from last year’s Halloween crafting.

no sew abby cadabby halloween costume

stash: My whole family was sick the last week in October and I didn’t start this until the night before Halloween. I was thankful that I had everything I needed in my stash, as I was really not up to shopping for costume supplies with a sick 3-year-old. Luckily, we were all well enough to go trick-or-treating on Saturday!

halloween fun

October has been a really fun month for us. We’ve been getting ready for Halloween since the first week, starting with decorating pumpkins at the beach. T’s mom brought these little pumpkins with her and Bella and my mom decorated them together. There’s a Daddy, Mommy, Bella and Chloe (the cat) pumpkin.

pumpkins

After we got home from the beach, we started working on ghosts. Some have pink polka dots and others have Hello Kitty stickers. There are a few with the traditional black and orange, too.

paper ghost garland

October was a really rainy month! One rare sunny day we went outside and collected leaves. Our neighborhood trees are finally starting to get big and we’ve got some really brilliant red leaves this year.

autumn blaze maple leaves

The week before Halloween is Fall Break for the Lincoln school system, so Bella’s preschool celebrated Halloween the week before. She brought home all kinds of spooky art: a q-tip skeleton, paper plate monster, triangle witch and an itsy bitsy spider with its own water spout. Her favorite activity was face painting. (There’s a pumpkin on her other cheek.)

preschool fun

We also did quite a few collages. You can see some of them over here. After I got tired of cutting shapes out of magazines, I bought some fancy pumpkin foam stickers for her.

pumpkin stickers

The most fun was Halloween itself. Bella was Abby Cadabby from Sesame Street. She wore her costume all day, visited with her friend Mason the Bat Man, handed out candy and trick or treated for the first time.

handmade abby cadabby costume

I can’t believe it’s November already. Time to put away the ghosts and bring out the turkeys!

how to sew a remote control pillow in five easy steps

I’m not sure why I’ve had pillows on my mind. Maybe because the sun has been hiding behind the clouds for too many days to count? Maybe it’s because I’ve been feeling under the weather? Maybe it’s because the holidays are fast approaching and I need some gift ideas for the guys in my life? Whatever the reason, I’ve been having fun. These are really easy. I know you’ll have fun, too.

remote control pillow

Notes

  • Remote Control Pillow v 2.0 is for those who only have one tv remote or are using a universal remote for all of their equipment. If you need a multi-pocket pillow, check out my Remote Control Pillow v 1.0 pattern.
  • Most likely, your pocket will have to be flipped and moved to accommodate a remote control. If your shirt doesn’t have a pocket, you can easily make one out of the sleeve or a contrasting scrap fabric. Be creative! Try a denim pocket from a pair of jeans.
  • Some men’s shirts don’t have buttons past the belt line. You can take one from the collar or cuff and stitch it on the band.
  • If you are using a smaller shirt, simply use a smaller pillow form. I usually sew the cover 1″ smaller than the pillow form size so the final pillow will be nice and firm.

denim pocket men's shirt pillow

Materials
1 – large men’s button shirt with pocket
1 – 18″ pillowform
seam ripper
matching thread

Step 1
With the shirt buttoned, cut a 17 1/2″ square out of the front of the shirt. Cut another 17 1/2″ square out of the back of the shirt.

Step 2
Carefully remove the pocket using a seam ripper. Spritz shirt with water and steam press to close up any holes. Reposition the pocket and topstitch in place.

Optional Step 3
If your holes don’t close, if you accidentally rip your fabric, or you are using a shirt like corduroy and the nap won’t fluff back up, you’ll need a patch. Just cut a square from the sleeve and topstitch it over the original area.

Step 4
Lay the pieces together right sides together and sew around the whole square with a 1/4″ seam allowance. Make sure to undo one or two buttons before sewing so you can turn it right side out afterward.

Step 4
Clip your corners, turn right side out and press.

Step 5
Insert your pillow form and button it up!

affordable decorative pillow button down shirt

This is an easy way to make decorative pillows, too. If you go to Goodwill on 99 cent day, this becomes a really affordable project. Plus, they organize their clothes by color, which makes it easy to find shirts that match your fabric. I used a little less than a fat quarter of fabric for the decorative pillow.

home decor pillow on a budget

recycle: Before you head out to the thrift store, check your own closet. All three of these shirts came from my husband. In fact, I have him trained now to ask me first before donating any of his clothes!

a little bit of pillow talk

This weekend I spent some time refashioning shirts into pillows. I had planned for this post to be an easy tutorial for Remote Control Pillow v 2.0. Then I got sick. I’m actually supposed to be resting, but I’ve been resting all day and feel the need to do something productive. So, here’s a glimpse of one of the pillows.

wardrobe refashion pillows

Now it’s back to the couch for me. Hopefully, I can muster up enough energy to knit a few rounds.

glue stick collages

I’m sure I’m not the only one who needs a little time alone with my knitting needles or sewing machine (or work!). I’m always trying to find non-TV related activities for my daughter so I can get a little bit of work done. The things that have kept her most occupied are crayons, paints and stickers. A lot of times she will sit and “read” books or get absorbed in her train engines.

Lately, it’s been hard to keep her occupied. She always wants to know what I’m doing—always wants to help out (which is sweet, but not always helpful). Today I got almost two hours of productive time. Want to know how? (OK, the title of this post gives it away.) My daughter has discovered the glue stick.

glue stick halloween collage

You know how I say nothing is safe if it fits under my presser foot? Well, not much is safe from my daughter if she can glue stick it to a piece of paper.

martha stewart living magazine

The images are from Martha Stewart’s Living, last year’s Halloween edition.

glue stick magazine on poster board

We have big plans for future collages. Thanksgiving and Christmas themes, animals, shapes, letters and numbers…the possibilities are endless.

magazine collage

Look, Mom! The owl and skeleton are holding hands!

I remember my friend Barbara telling me how she spent her evenings cutting up National Geographic magazines so her granddaughter could make collages. Such a brilliant and simple idea. I highly recommend it!

recycle: You will be amazed at what you can find in your recycle bin for this project. Don’t overlook catalogs and non-crafty magazines. Pay close attention to ads. Tip: for maximum productivity, cut the pictures out the night before.

my creative space

knitting a marsan watchcap for my daughter

My creative space is filled with knitting today. Actually, re-knitting.

You know how everyone always says gauge is so important? Well, getting your daughter’s head measurement right in the first place is even more important.

Yep, that’s her first hat in the background of the picture. I measured a moving target and came up with 19 inches. Never measure a moving head. After we determined that it wouldn’t fit and my gauge was spot on, I measured her head while standing still. 20 inches.

So, I’m re-knitting and since there is snow in the forecast, I’m bumped this project up to the top of my to-do list.

What’s in your creative space today?

Visit more creative spaces over at Kirsty’s blog.

. . . . .

Non-knitters: the simplest definition of gauge is how many stitches you knit per inch. Multiply stitches per inch by number of inches to figure out how many stitches you need for something to fit. I multiplied my gauge by too few inches and wound up with a hat that is too small.

wardrobe refashion: trying to keep my pledge

I made a deal with myself that I was going to lose some weight before fall. I didn’t want to have to go out and buy new clothes just because the ones in my closet didn’t fit. I was doing really good until vacation. Pretty much all of the weight I lost at the end of the summer came back home with me on the plane. When we landed, there was snow on the ground. I couldn’t put it off any longer. I had to buy some new pants.

My wardrobe refashion pledge actually made me feel like this process would be easier. At a thrift store, you’ve got all kinds of brands and sizes on the same rack. I figured I would have a better chance at finding something than at a single brand store. I was wrong. It took 3 different stores and trying on about 20-30 different pairs at each store, to find one pair of jeans and two pairs of corduroys that fit.

Although this was harder work than just heading over to the mall, I feel much better with the quality of clothing I bought. Those capris that I complained about last spring barely lasted the season. I am not about to put that much time and effort into clothes that don’t last.

So why am I having a hard time trying to keep my pledge?
I know that if I walked into The Gap and found a pair of pants that fit perfectly, I’d have to buy a pair in every style and color. Seriously. And I won’t lie to you. I’ve been saving my Get out of Refashionista Jail Free card just in case. Pants that fit well make or break how someone looks, in my opinion. I can look past ratty sneakers or a worn t-shirt any day, but I can’t be busting out of my jeans. I just can’t.

What about you?
Are you fed up with the lack of consistent sizing in women’s clothing? Do brand new clothes last more than one season for you? Am I the only one who gets this darn frustrated over a pair of pants?

handmade gift bag that’s also a gift

Yesterday we went to John Deere-themed birthday party for a four-year-old boy. My husband asked, “could we just buy a gift? Does everything have to be handmade? Can’t we get something from the store?” I agreed, as long as we didn’t buy him an actual tractor toy. I figured every four-year-old boy must have at least some kind of tractor, right? How would we know what to get? What if someone gets him the same tractor? Let’s get him some books about tractors instead. And maybe some tractor stickers, too. As my husband bought into my reasoning, I was secretly planning a handmade, tractor-themed, re-usable gift bag.

reusable gift bag

I admit I was planning to buy some John Deer fabric to make this. Just before I left the house, I decided to dig through my stash and I found two fat quarters of tractor-green fabric! I think it’s a polyester blend and it feels way more durable than quilting cotton. I figured I could make my own tractor-themed artwork with my new hobby.

tractor embroidery

In the end, my husband and I were both happy with our gift. I hope my daughter’s friend will be, too.

recycle: I bought a big stack of colored cloth napkins at a garage sale awhile ago. I think they were napkins. They kind of feel like the fabric used to make restaurant napkins, except they were every color of the rainbow and only a few matched. Whatever they used to be, they are nice and sturdy. I think they’ll be great for storing all kinds of tractors and trucks.