my creative space

recharging creative spirit at the beach

Today I’ll be at the beach relaxing and renewing my creative spirit. I’m planning to finish knitting a wool hat for my husband. There’s also a cute yarn and fabric store that I spied last night on the way to dinner. I’m going back today to take a little look around. I might even come home with something. After all, if I finish the hat, I’ll need a project for the plane ride back, right?

What’s in your creative space today?

Visit more creative spaces over at Kirsty’s blog.

wardrobe refashion: dressing up a pair of flip flops

What kind of shoes should a three-year-old girl wear to a beach wedding in October? Will the weather be warm or cold? Should the shoe be casual or dressy? Should you invest in sandals that will probably be too small by next Spring? Where are you even going to find sandals this late in the season?

I decided to take some simple, casual flip flops and dress them up. Here is the before picture:

dress up a pair of flip flops

Step 1
I took four strands of embroidery thread and weaved them through the existing stitches with a needle.

dress up a pair of flip flops

Step 2
I crocheted a flower and stitched a button on the center. Then I sewed the flower onto the strap.

dress up a pair of flip flops

Step 3
I tried to get my daughter to wear them, but she wasn’t interested at all. In fact, she wound up wearing her sporty little sandals with her cute frilly dress. I guess I can always remove the flowers and put them on another pair of flip flops next season.

dress up a pair of flip flops

refashion: I used embroidery thread, cotton yarn and vintage buttons from my stash. The flip flops came from Once Upon a Child. The crochet flower pattern is from My Crochet Stuff.

my creative space

laptop bag purse

Today my creative space is filled with finishing. I just finished this laptop bag/purse for myself. Hopefully, we’ll get a little sun today so I can get some more pics. I’m also finishing up another tote for an etsy order. Plus, I’ve got to whip up two gift bags for these projects and I’m going to try and fit in a little mending in the evening.

What’s in your creative space today?

Visit more creative spaces over at Kirsty’s blog.

ghost of the past: crochet amigurumi pattern

glow in the dark ghost

Tomorrow is the first day of October. Are you ready for Halloween? I posted this pattern on my personal website last year, but I have so many new readers over here, that I thought I’d share it again. I think it would be fun to make a big pile of these and string them on a garland!

Glow in the Dark Ghost with Picot Ruffles

Materials
glow in the dark yarn or any worsted weight white yarn
size G/6 (4mm) crochet hook
two black beads for eyes
black yarn for smile
tapestry needle for beads and weaving ends
optional: polyester fiberfil

sc: single crochet
sl st: slip stitch

R1: chain 2, sc 6 in second chain from hook
mark the beginning of your row, move your marker up on each completed row
R2: 2 sc in each stitch around (12 stitches)
R3: *sc 1, sc 2 in next stitch* around (18 stitches)
R4: *sc 2, sc 2 in next stitch* around (24 stitches)
R5-7: sc around
R8 : sc 9, sc with bead, sc 3, sc with bead, sc 10
R9-15: sc around
R16: *[sl st, chain 3, sl into same st] sc* around for picot edging

Tie off, sew on a little smile, and weave in your ends.

I didn’t crochet a base because of the picot ruffle. Not to say that it couldn’t be done. This is more decoration than a toy, so I stuffed it with fiberfil to give it shape, but it’s open on the bottom.

how to sew a baby quilt in five easy steps

snoopy baby quilt

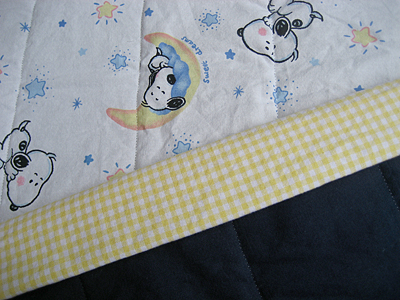
So you’d like to make a quilt, but you’re intimidated by all of those little pieces, right? I am, too. But you can make a quilt without blocks. It’s easy and looks just as nice! Here’s how I did it:

Materials
1 – 36×36″ piece of top fabric
1 – 36×36″ piece of bottom fabric
1 – 36×36″ piece of batting
1 – 38×8″ piece for making the trim*
matching thread
bias tape tool
rotary cutter and ruler
walking foot (optional)

*even easier: use 4 yards (plus a few inches) of pre-made bias tape

Step 1
Lay your fabric on the floor wrong sides together with the batting in the middle. Pin baste from the center outward.

Step 2
Starting from the center and working your way outward, draw parallel lines every four inches with sewing chalk, water soluble pen or light pencil.

Step 3
Starting from the center, sew along these lines working your way outward, taking out the basting pins as you go. Here’s where a walking foot is helpful, but if your batting isn’t too thick, you should be fine without it. Square up your edges with a rotary cutter and ruler.

Step 4
Cut your trim fabric according to the measurements for your bias tape tool and make the trim. Even easier: open the package of pre-made bias tape.

Step 5
Fold the trim over the edge and attach with a zig zag stitch. Fold the ends over at the corners to enclose the raw edges.

snoopy baby quilt

I hope I didn’t oversimplify this, but it’s really easy. The zig zag trim takes a little practice. This was my first time, and I’m sure it will get a lot neater the more I do it.

resource: I was inspired by Soule Mama’s Beach Blanket To-go for this blanket. One day I hope to make something as beautiful as her daughter’s quilt, but for now, I’m going to stick with single pieces of fabric until I’ve got more free time.

thrifty finds

I posted over on facebook that I found a brand new cashmere sweater for $3.50 and had a request for a picture. It’s brown, super soft and fits perfectly!

cashmere sweater

I found it at my neighbor’s garage sale. I always stop by her sales because she has such cute kids clothes. (This dress was from her, too.) I was excited to find something for myself! I also came home with a few things for my daughter. I tried really hard to focus on fall and winter, but couldn’t resist this sundress!

toddler dress with blue bow and flowers

That was Thursday. Friday I went to Neat Repeatz, which is a huge kids consignment sale. This year there were so many clothes to go through! I had good luck and came home with some nice shirts and corduroy pants.

My biggest challenge was keeping my daughter occupied while I shopped. As soon as we arrived, we headed straight for the book section. After she was done “reading” what we had picked out, I wound up getting her this little electronic Cars game. It’s pretty dumb and I really hate it, but it got us through! Hopefully it will settle at the bottom of the closet and we can donate it soon.

granny square scarf almost finished

granny square scarf

You’d think that with all of this gift making I wouldn’t have any time to make something for myself. These granny squares are perfect for fleeting moments of “me time” and I can’t believe the progress I have made! I’m going until I’m out of yarn, which will probably be two more squares. I’m loving the atypical, monochromatic look.

Even though these are fun and working up quickly, I can’t imagine doing enough for a blanket. I’m not even looking forward to seaming these together for a scarf. Any future granny projects will probably be small ones for me!

project notes: Granny pattern from Attic24. Yarn from Freecycle.

sleeping snoopy baby quilt

sleeping snoopy baby quilt

Every time I turn around it seems like someone else is having a baby. I love crafting for babies. This quilt is almost finished. All I need to do is attach the binding. I bought a lot of this fabric off of ebay awhile ago. You might be thinking, “That looks familiar!” The first quilt I made was backed with fleece. This one is backed with navy cotton. (It’s really not that dark, but I don’t have much sun for taking pictures today.) I only have a little bit of the binding fabric, but it should be just enough.

Update on birthday crafting: The knitted gift is finished. The embroidery tea towels are almost done. These are going much better than my experiment with cross stitch. I’m using a simple split stitch and loving it. I can’t wait until I can post pictures!

stash: So far I’ve used stash yarn, embroidery thread, fabric and batting for all of my projects. Having everything at my fingertips really makes all of the thrifting and garage sale-ing I did earlier in the year worth it!

hand-painted thank you cards

hand painted thank you card

A few weeks ago, my daughter spent the morning painting while I worked. She wanted to practice her letters, so I started calling out T – H – A – N – K… See a pattern starting here? With a little help, she almost wrote all of the letters for a thank you card. After her birthday, I took some pics of the paintings and rearranged them in Photoshop to make this:

hand painted thank you card

And for the inside of the card:

hand painted thank you card

I printed them on our color inkjet and used them for her birthday thank yous. I even made a template for you to use, without the “Love Bella” of course, because I know you think that “K” is super cool! You can download it here.

my creative space

linen tea towels and wool knit gloves

Today my creative space is filled with gift making. I’m embroidering, sewing, and knitting and having so much fun! Unfortunately, I can’t show you more until after the gifts have been delivered.

I can tell you that I am making more tea towels and really need to get practicing with that rolled hem foot again. I’d really like to make some more towels and napkins for my family. They don’t need to be fancy, but we should be using them more than we use paper towels and napkins.

Visit more creative spaces over at Kirsty’s blog.