momi the mermaid amigurumi

My daughter is in love with Momi the Mermaid. My parents gave her Tropical Water Hide-and-Seek last year and I found Land of Delight at Neat Repeatz last week.

momi the mermaid by yuko green

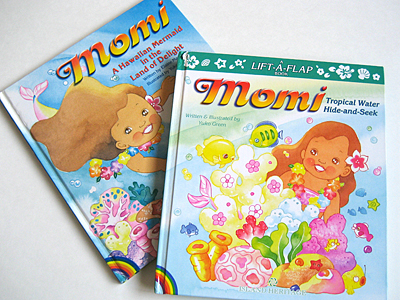
A few weeks ago, she asked me to crochet a Momi. She opened to a specific page in her book and made sure I understood that Momi needed a “flower necklace” and a flower in her hair.

She was a tricky little mermaid with a multi-colored tail and that hair! Let’s just say, I’m not the best doll maker in the world. Hearts, flowers and hats I can do great, but arms with hands? (Yes, Mom, she needs hands!) The hardest part was her lei. I used an incredibly small hook (1.3 mm!) and embroidery thread.

momi the mermaid by yuko green

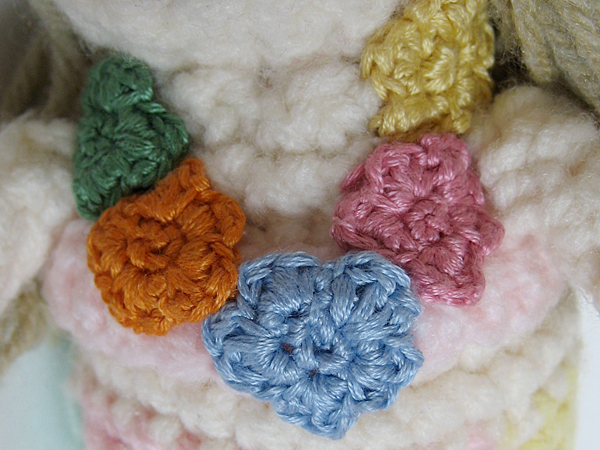
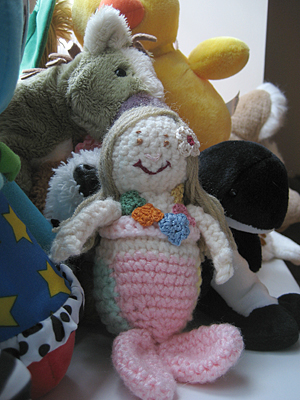
I think I did a pretty good job. My daughter is a little bummed that I didn’t crochet flowers all the way around her neck. (But Mom, she’s missing part of her necklace!) I guess I’ll be adding a few flowers to her lei. In the meantime, Momi has been released into the wild, i.e., my daughter’s bedroom. I think she likes her new home on the shelf next to Octopus and Orca.

momi the mermaid by yuko green

thrifted: I don’t have a lot of pastel yarn, especially pink. One day when I was running errands I felt a pull to the nearby Goodwill. I went in and followed The Force back to the craft section. There was a big bag of pastel yarn with everything I needed. I love crafty kismet!

tiny crochet heart pattern

I wanted to make some really small hearts for Valentine’s Day crafts, but couldn’t find any patterns online that I liked. After a few tries, I came up with these little cuties.

tiny crochet hearts

Tiny Crochet Heart Pattern
worsted weight yarn
size F/5 (3.75mm) crochet hook
tapestry needle for weaving ends

hdc: half double crochet
sc: single crochet
sl st: slip stitch

gauge: not important, but mine are about 1 1/2 – 1 1/4 inches across

“Big” Tiny Heart (the one on the left)
Make a magic ring.
R1: chain 1, sc into loop 7 times, pull loop closed, join with sl st to chain 1
R2: sl st into 1st stitch, 5 hdc into second stitch, hdc in next two stitches, hdc then chain 1 and hdc again in the bottom stitch, hdc in next two stitches, 5 hdc into next stitch, sl st in original sl st.

Give the tail a little tug to help form the heart V at the top, tie knot, weave ends.

Give the bottom stitches a little tug to make the V point at the bottom.

“Small” Tiny Heart (the one on the right)
Repeat pattern, but replace sc for hdc.

cupcake with chocolate icing, please

Last Friday my daughter noticed that the cork stopper on our sugar jar was shaped like a cupcake. (It looks like this.) She carried it around all day and wanted to take it to bed with her (so Puppy and Mickey could have a midnight snack, perhaps?). I asked her, “if you could have a cupcake with icing, what kind of icing would you like?” “Chocolate!”

amigurumi crochet cupcake

I whipped up this little thing before I went to bed and left it on the kitchen table for her. I love doing that! It’s so fun to watch her find it in the morning. It’s already starting to look well loved, isn’t it?

stash: Thrifted yarn and beads from my stash. Free cupcake pattern from BitterSweet.

ghost of the past: crochet amigurumi pattern

glow in the dark ghost

Tomorrow is the first day of October. Are you ready for Halloween? I posted this pattern on my personal website last year, but I have so many new readers over here, that I thought I’d share it again. I think it would be fun to make a big pile of these and string them on a garland!

Glow in the Dark Ghost with Picot Ruffles

Materials
glow in the dark yarn or any worsted weight white yarn
size G/6 (4mm) crochet hook
two black beads for eyes
black yarn for smile
tapestry needle for beads and weaving ends
optional: polyester fiberfil

sc: single crochet
sl st: slip stitch

R1: chain 2, sc 6 in second chain from hook
mark the beginning of your row, move your marker up on each completed row
R2: 2 sc in each stitch around (12 stitches)
R3: *sc 1, sc 2 in next stitch* around (18 stitches)
R4: *sc 2, sc 2 in next stitch* around (24 stitches)
R5-7: sc around
R8 : sc 9, sc with bead, sc 3, sc with bead, sc 10
R9-15: sc around
R16: *[sl st, chain 3, sl into same st] sc* around for picot edging

Tie off, sew on a little smile, and weave in your ends.

I didn’t crochet a base because of the picot ruffle. Not to say that it couldn’t be done. This is more decoration than a toy, so I stuffed it with fiberfil to give it shape, but it’s open on the bottom.

birthday crafting

Last Friday was Brady’s birthday, and in keeping with my pledge, he received some handmade goodies from us. I had made him some Peanuts bibs for Christmas (which I forgot to take a picture of for the blog — you can see one in action here) and I decided to stay with that theme.

snoopy and ball

The ball is a pattern from the Purl Bee and was really fun to make. I used some leftover fabric from the bibs. I think I’m going to do the same for M with the leftovers from her bibs. She really liked it!

Snoopy is a pattern from Chibi Ami. I found it on ravelry. I think you can find a pattern for pretty much anything on ravelry!

It’s a great feeling to watch someone enjoy a present that you made by hand. Brady had a huge smile on his face when he pulled the ball out of the bag, and when we left, he was chewing on Snoopy’s ear. I’m pretty sure that’s a universal sign of toddler approval.

………………..

Shop update: more felted heart coffee sleeves are up in my etsy store.

glow in the dark ghost pattern

A few weeks ago I totally got sucked in by Halloween marketing. “We’ve got glow in the dark yarn!” screamed the ad. “Wow! That would make a cool amigurumi ghost!” I thought. I marched off with my 40% of coupon, got my yarn, and then came home to look for a pattern. But I couldn’t find any I really liked, so I just improvised. You’ve already seen the first one.* I like this one a little better, especially with the picot ruffles at the base. This little ghost is for sale in my etsy shop, but if you know how to crochet, don’t buy it from me unless you’re really busy saving lives or something because it takes no time at all to whip one up. Heck, crochet a whole pile of them and string them together to make a Halloween garland!

*By the way, when T turned out the light and the little ghost started to glow, M handed it right back to him. It’s sitting on my windowsill now keeping my pumpkin and apple company.

Glow in the Dark Ghost with Picot Ruffles

materials:
glow in the dark yarn or any worsted weight white yarn
size G/6 (4mm) crochet hook
two black beads for eyes
black yarn for smile
tapestry needle for beads and weaving ends
optional: polyester fiberfil

sc: single crochet
sl st: slip stitch

R1: chain 2, sc 6 in second chain from hook
mark the beginning of your row, move your marker up on each completed row
R2: 2 sc in each stitch around (12 stitches)
R3: *sc 1, sc 2 in next stitch* around (18 stitches)
R4: *sc 2, sc 2 in next stitch* around (24 stitches)
R5-7: sc around
R8 : sc 9, sc with bead, sc 3, sc with bead, sc 10
R9-15: sc around
R16: *[sl st, chain 3, sl into same st] sc* around for picot edging

Tie off, sew on a little smile, and weave in your ends.

I didn’t crochet a base because of the picot ruffle. Not to say that it couldn’t be done. This is more decoration than a toy, so I stuffed it with fiberfil to give it shape, but it’s open on the bottom.