quick and easy wrist warmer pattern

wrist warmer crochet pattern

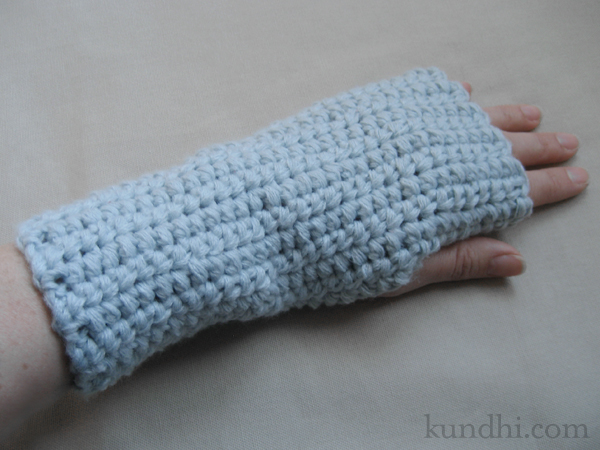
I made these wrist warmers for our mail carrier. She is awesome. We ship and receive a lot of mail packages and she always comes to our door, even in below zero temps. I know she has to keep her fingertips exposed, so I thought wrist warmers would be a nice gift.

The pattern as written fits an average size woman’s wrist. If you need it bigger or smaller (for a guy or child), whip out your tape measure and adjust the measurements accordingly. I measured around my knuckles, not including my thumb, and rounded down to 7 inches for a snug fit.

wrist warmer crochet pattern

Materials
any yarn (I used bulky yarn to make the project go fast)
corresponding size hook (I used size I)

DC: double crochet
SC: single crochet

tip: I tend to make my first chain really tight no matter how hard I try to keep it loose. To compensate for this, I chain and dc my first row with a hook size larger. That keeps my edges consistent for Step 6.

Step 1
Crochet a gauge swatch in double crochet. I know some people hate making these, but it’s really not that hard, so just do it. Figure out how many stitches you have in an inch, then figure out the following:

A = gauge x 8 1/2
B = gauge x 2
C = gauge x 4

My gauge was 3 1/2 stitches per inch. I’ll put my numbers in parentheses in case you find the letters confusing.

Step 2
Chain A. (30)

Step 3
DC back and forth for six inches.

note: You’ll notice that I don’t chain at the beginning of each row. I use faux double crochets instead. They really make your edges much neater.

Step 4
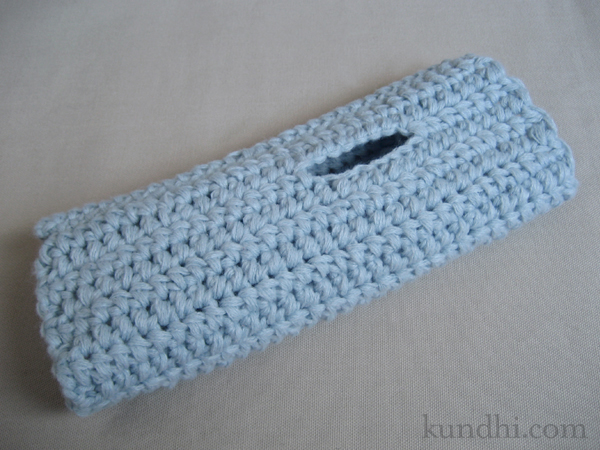
Make the thumb opening: DC B (7), chain B (7), skip B (7), dc to end of the row.

Step 5
DC across, including chain stitches, and continue back and forth until piece measures 7 inches.

Step 6
SC the last row and your first chain row together to make a tube. Cut yarn, weave ends and turn inside out.

wrist warmer crochet pattern

Step 7
Repeat for the other hand, but change Step 4 to the following:
Make the thumb opening: DC until C (14) stitches remain, chain B (7), skip B (7), DC B (7).

stash: I used recycled sweater yarn for these. It’s a soft acrylic that’s machine washable. I may need to make a pair for myself, too!

how to: crochet jar cover in 3 easy steps

quick jar cover

This is what’s left of my outdoor garden. We did not have very good luck this year: no tomatoes and only one cucumber. My petunias were doing great until a big storm almost blew them out of the pot. Sadly, I didn’t notice the roots were above the soil until the whole thing was turning brown.

You know what is growing? My daughter’s little grass pot. She made this in summer camp and it’s the greenest, healthiest plant of the summer. The container is just a recycled plastic jar and I figured after almost two months, it finally deserved a proper cover.

How to Crochet a Jar Cover in 3 Easy Steps

Materials
worsted weight yarn
size G hook

Gauge is not important for this project.
Adjust your hook size for different yarn weight.

Step 1
Chain enough stitches so that the chain fits snugly around the jar. Join to make a circle.

Step 2
Single crochet around and around until you’ve got the height you want.

Step 3
You’re going to want an even top edge, so we’re going to pick a spot to start the top row. (You can use the tail as a guide and follow the line of stitches up if you want to be precise.) Slip stitch, chain one and single crochet around until you reach the chain one. Slip stitch into the chain one and finish off.

When you weave in your ends, use the tails to even up the bottom and top edges. You can see in the picture that my bottom edge isn’t perfect. Oh, well.

stash: This is a great project for using up leftover yarn. Because the rows spiral up, it’s not great for stripes. You’ll get a “jog” when you change colors.

how to sew a placemat zipper pouch with only four seams

zipper pouch tutorial

I found this cute Orla Kiely placemat at Target a few weeks ago and wanted to make something quick and easy for my knitting. Because the edges are already finished, I only needed to sew four seams. If you want a gusseted pouch, you can sew two more seams. Either way, it’s a very fast and easy project.

zipper pouch tutorial

Materials
a placemat (mine was 14 x 17 inches)
a zipper that’s at least 14 inches
coordinating thread
heavy duty sewing needle
zipper foot

zipper pouch tutorial

Using your zipper foot, stitch each 14 inch side to the zipper, beginning and ending 1/2 inch from each side.

zipper pouch tutorial

With the zipper halfway open, turn the placemat inside out. Sew your side seams while holding the zipper out of the way. (This is why you left 1/2 inch unsewn on each side.)

zipper pouch tutorial

Turn the placemat right side out and you’re done! If your zipper was longer than 14 inches, you can trim the extra.

Optional Gussets

zipper pouch tutorial

Box your corners, but don’t trim. The triangles are small and won’t take up much room. Plus, you’ll have no raw edges that might unravel.

zipper pouch tutorial

Want to see more projects using Orla Kiely placemats? Thimbly Things made a cute purse with hers and linked to a bunch more adorable bags.

refashion: Using finished items like placemats make your projects fast and easy because your edges are already finished.

Thanks to Whip Up, Craft Gossip and One Pretty Thing for linking to my tutorial. Subscribe to my RSS for more crafty goodness!