homemade valentine box

20130213-125752.jpg

Sometimes the simplest projects are the best.

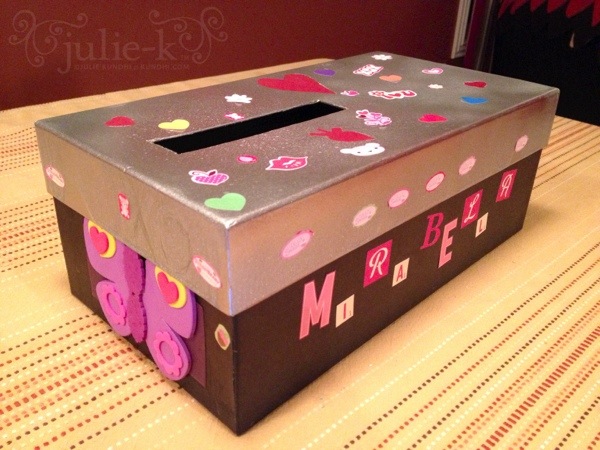
My daughter had to decorate a shoebox for collecting valentines in school. The most important detail: it had to have a trap door for removing the cards. My husband worked out the placement with her and did the cutting. I spray painted over the logos on the lid and provided some stickers for her name.

That’s all it took to make our girl happy. Of course, she had to add a butterfly and more Valentine’s stickers. You can never have enough stickers!

I have a feeling this box will be around for many years to come.

valentine’s day pencil cards

valentine's day pencil toppers

We are doing very simple Valentine’s Day cards this year. I wanted to keep my daughter involved in the process, but between preschool and nature school, she’s got over 30 classmates. Even though she loves crafts, I can’t imagine her staying interested in such a big project.

valentine's day pencil toppers

We picked out Valentine’s pencils together and we used what we had for the cards. You’ll notice that she didn’t use any of the supplies I gathered, but chose her own stickers and pencil for the project — such crafty independence!

Using the big scallop paper punch, I cut out a bunch of flowers. I told her she could decorate them anyway she liked, but she had to make sure she put her name on them. Once finished, we taped them to the pencils.

We started this project early and she’s been doing a few a day. We’ll see if they get finished by next week or if I’ll have to make up the last few.

What do you do for Valentine’s Day cards? Buy or make? Include candy or not? Is your child involved in the process?

from the archives: handmade valentine’s cards, valentine’s day heart bunting, tiny crochet heart pattern

valentine’s day heart bunting

Last year I made a paper heart bunting for our kitchen window. When I went to hang it this year, it was gone. Maybe I stored it in a safe place? Maybe I recycled it? I wish I could remember. Anyway, it was a good excuse to make a new one. I forgot to take a before picture of the tea towel I used, but you can see part of it in this creative space.

valentine heart garland

It was basically a grid of small and big hearts. I cut along the small hearts and then serged the side and bottom raw edges, trimming the small hearts off as I went along. I folded over some bias tape and stitched in the top edges.

valentine heart garland

I managed to create this from start to finish during my daughter’s “quiet time.” I don’t remember the last time I completed a sewing project so fast. Plus, I think I’m finally figuring out how to master the tension on my serger!

recycle: Garage sale tea towel: 25 cents. Bias tape part of a Goodwill grab bag.

sweetheart zipper bag

sweetheart cosmetic bag

This fabric is a little more kitschy than my usual style, but I really love it. Valentine’s Day is just around the corner and I wanted to make something fun. I couldn’t bring myself to cut into all of those cute hearts, so I used the entire piece for one big bag.

sweetheart cosmetic bag

Some would say it would be great for cosmetics, but it can easily hold two skeins of yarn and knitting/crochet notions. I used fleece for the interfacing, so it stands up on its own, but it’s still soft. I’m tempted to keep it, but right now I’ve got it up in the shop. (I can’t keep everything I make!)

thrifting: This fabric came from The Grandmother Stash, same as the pink eyelet quilt.

my creative space (a day late)

scarf, bunting and zipper bag

I can’t believe I missed the first Creative Space of 2010! I was so busy last night playing around with my “new yarn” that I totally forgot to write a blog post. Whoops!

My creative space for today, and most of this weekend, is filled with the color red and lots of pretty hearts. I’m making good progress on my red scarf for Craft Hope. I have to take pictures of a sweetheart zipper bag that I finished up yesterday. And last, but not least, I plan on making a Valentine’s Day bunting out of this tea towel.

I’ve been missing Kirsty’s Creative Spaces and I’m so glad she’s hosting them again. You really should check out all of the wonderful blogs listed!

tiny crochet heart pattern

I wanted to make some really small hearts for Valentine’s Day crafts, but couldn’t find any patterns online that I liked. After a few tries, I came up with these little cuties.

tiny crochet hearts

Tiny Crochet Heart Pattern
worsted weight yarn
size F/5 (3.75mm) crochet hook
tapestry needle for weaving ends

hdc: half double crochet
sc: single crochet
sl st: slip stitch

gauge: not important, but mine are about 1 1/2 – 1 1/4 inches across

“Big” Tiny Heart (the one on the left)
Make a magic ring.
R1: chain 1, sc into loop 7 times, pull loop closed, join with sl st to chain 1
R2: sl st into 1st stitch, 5 hdc into second stitch, hdc in next two stitches, hdc then chain 1 and hdc again in the bottom stitch, hdc in next two stitches, 5 hdc into next stitch, sl st in original sl st.

Give the tail a little tug to help form the heart V at the top, tie knot, weave ends.

Give the bottom stitches a little tug to make the V point at the bottom.

“Small” Tiny Heart (the one on the right)
Repeat pattern, but replace sc for hdc.