knitting fair isle for marriage equality

marriage equality pin

If you spend time on Facebook and Twitter, you’ve probably noticed a lot of red squares with pink equal signs. It is a way for people to show their support for marriage equality. I wanted to do more than just change my social media avatars, so I knit up a little pin.

I don’t often knit with two colors, and I tried this a few different ways. Intarsia was easier, but too many ends to fiddle with. Duplicate stitch over a red square looked just ok. I even tried crochet, but the lines just weren’t straight enough. Fair isle won out in the end.

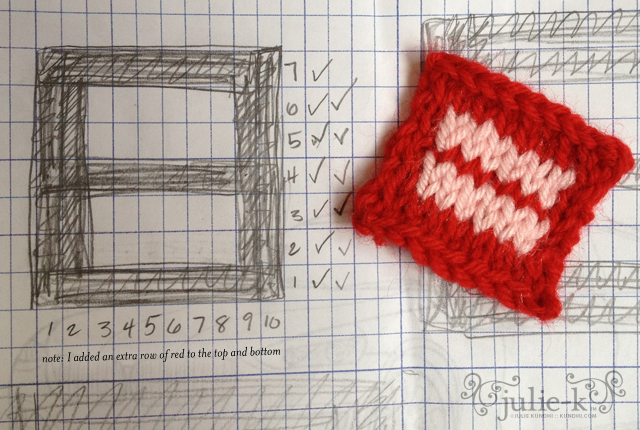
I’m offering the chart with the disclaimer that when it comes to fair isle, I really don’t know what I’m doing. Even though I checked my gauge and made a chart, my first few tries came out more rectangular. I wound up adding a row of red to the top and bottom to even things out. Blocking into shape was also a must.

notes: Red yarn was Lion Brand wool. Pink yarn was a random soft acrylic from my odds and ends bin. I used size five needles. Finished size is 2 x 1 3/4 inches. I also found some great video tutorials that helped me out.

How to Knit Fair Isle with Two Hands
How to Knit Fair Isle Neatly in Purl
How to Carry the Yarn Across the Row

Also, here is a site where you can generate and print graph paper according to your gauge.

tiny crochet flower pattern

I wanted to make some tiny crochet flowers last week, and figured I could just add a petal to my four leaf clover pattern. Five petals were too bulky, however, and they looked crowded. I reworked the petal a little bit and came up with these cuties. Happy Spring and enjoy the pattern!

tiny crochet flower pattern

Tiny Crochet Flower Pattern
worsted weight yarn
size F/5 (3.75mm) crochet hook
tapestry needle for weaving ends

dc: double crochet
hdc: half double crochet
sc: single crochet
sl st: slip stitch

gauge: not important, but my worsted weight flowers are about 1 1/2 inches across.
Note: The smaller flowers were made with a smaller hooks and different sock yarns.

Make a magic ring.
R1: chain 1, sc into loop 5 times, pull loop closed, join with sl st in first stitch
R2: continue in the first stitch with a hdc, dc, chain 1, dc, hdc; *sl st, hdc, dc, ch1, dc, hdc* in each of the four remaining stitches, finish with a sl st

. . . . . . . . . .

I’ve been trying to document my creative projects at least once a day using Instagram. It automatically posts my pictures to twitter, facebook, flickr and my rss feed. If only it could update the blog! Anyway, if you are on any of these platforms, stop by and say hello!

halloween crochet fun!

Halloween is in just a few days. Do you need a quick, fun and spooky crochet project? Here are some of my favorites.

crochet pumpkin amigurumi

julie-k tiny crochet pumpkin

crochet spider amigurumi

julie-k tiny crochet spider

glow in the dark ghost

julie-k glow-in-the-dark ghost

undead dolls

undead gang from Creepy Cute Crochet

Are you making anything for Halloween? Share in the comments!

easy kids bike shorts pattern

wardrobe refashion

The bike shorts pattern is finished and ready for download! It’s been over two years since my original Easy Kids Shorts pattern and I do a few things differently now.

  • These days I sew the inseams first, then the rise.
  • I almost always use a 1/4 inch seam allowance instead of 1/2 or 5/8 inch, usually because I’m trying to squeeze as much as I can out of a piece of fabric or t-shirt.
  • 3/4 inch elastic seems to be more comfortable around the waist than the smaller widths.
  • Now that I have a serger, I finish my raw edges and just fold the waist over once. You can finish your edges with a zig zag/overlock edge or adjust the pattern to accommodate the double fold waist.

I recommend you pay attention to the type of knit fabric you use. The original piece I traced for this pattern was a tightly-knit jersey. The t-shirt I used was a loosely-knit jersey and the shorts turned out a little big. Not big enough to re-sew, but definitely roomier.

Finally, my daughter is long and lean: 20 inch waist and 14 inches from waist to knee. Adjust seam allowances and elastic size to get a better fit for your child. Want them shorter? Trim off the bottom of the pattern an inch or two.

Please leave any questions in the comments. Download the pattern here. Enjoy!

quick and easy wrist warmer pattern

wrist warmer crochet pattern

I made these wrist warmers for our mail carrier. She is awesome. We ship and receive a lot of mail packages and she always comes to our door, even in below zero temps. I know she has to keep her fingertips exposed, so I thought wrist warmers would be a nice gift.

The pattern as written fits an average size woman’s wrist. If you need it bigger or smaller (for a guy or child), whip out your tape measure and adjust the measurements accordingly. I measured around my knuckles, not including my thumb, and rounded down to 7 inches for a snug fit.

wrist warmer crochet pattern

Materials
any yarn (I used bulky yarn to make the project go fast)
corresponding size hook (I used size I)

DC: double crochet
SC: single crochet

tip: I tend to make my first chain really tight no matter how hard I try to keep it loose. To compensate for this, I chain and dc my first row with a hook size larger. That keeps my edges consistent for Step 6.

Step 1
Crochet a gauge swatch in double crochet. I know some people hate making these, but it’s really not that hard, so just do it. Figure out how many stitches you have in an inch, then figure out the following:

A = gauge x 8 1/2
B = gauge x 2
C = gauge x 4

My gauge was 3 1/2 stitches per inch. I’ll put my numbers in parentheses in case you find the letters confusing.

Step 2
Chain A. (30)

Step 3
DC back and forth for six inches.

note: You’ll notice that I don’t chain at the beginning of each row. I use faux double crochets instead. They really make your edges much neater.

Step 4
Make the thumb opening: DC B (7), chain B (7), skip B (7), dc to end of the row.

Step 5
DC across, including chain stitches, and continue back and forth until piece measures 7 inches.

Step 6
SC the last row and your first chain row together to make a tube. Cut yarn, weave ends and turn inside out.

wrist warmer crochet pattern

Step 7
Repeat for the other hand, but change Step 4 to the following:
Make the thumb opening: DC until C (14) stitches remain, chain B (7), skip B (7), DC B (7).

stash: I used recycled sweater yarn for these. It’s a soft acrylic that’s machine washable. I may need to make a pair for myself, too!

tiny crochet ornament bookmark pattern

tiny ornament bookmark crochet pattern

I’m sorry my pictures aren’t the greatest for this post. The sun went down too early today. I can’t wait for the winter solstice. I just can’t get my photo-taking act together before dinnertime. I might try and retake the photos over the weekend.

This is the same pattern I used for the tiny baseball bookmarks, without the little top of course. If you want to do baseballs, I recommend marking the curves with a disappearing ink pen before embroidering the red stitches. It really helps!

tiny ornament bookmark crochet pattern

Tiny Crochet Ornament Bookmark Pattern
worsted weight yarn (I used Brown Sheep Cotton Fleece)
size F/5 (3.75mm) and D/3 (3.25mm) crochet hooks
tapestry needle for weaving ends
small bead

sl st: slip stitch
sc: single crochet
inc: 2 sc in one stitch

gauge: not important, but mine is about 1 1/2 inches wide

ornament
With larger hook, make a magic ring.
R1: 6 sc into ring
Ornament worked as a spiral. Place marker to keep track of rounds.
R2: inc in each stitch around
R3: *inc, sc* around
R4: *2 sc, inc* around until last two stitches. Sl st in last two stitches.
R5: sc in first stitch, change to smaller hook, chain 55, add bead, chain 5
Finishing: cut yarn, tie knot, thread end back through bead, tie double knot, trim close to knot.

ornament top
R1: pick up stitches at top of ornament as follows: pick up and chain 1, *pick up and sc* three times, turn work
R2: chain 1, sc 3
Finishing: cut yarn, add a little loop between middle two stitches while weaving in ends

These work up really fast and add a nice handmade touch to book gifts this holiday season. I’ve got a lot of books on my list for Santa — better make a few more just for myself. Enjoy!

stash: These only take a tiny bit of yarn. You can definitely go stash diving for this project!

tiny crochet spider pattern

crochet spider amigurumi

Thank you for the wonder feedback on my little pumpkin pattern. I’ve received the nicest comments and have been flattered by how many people have linked back to it.

When I sat down a few weeks ago to make some little crochet balls, I didn’t intend to whip up a bunch of Halloween-inspired projects, but you go where the inspiration takes you.

This spooky little spider is fast and easy to make. You still have plenty of time to crochet one (or a few) before October 31st. Have fun!

Spider Legs (make eight)
These are just like the pumpkin stem, only longer.
R1: chain 12
R2: sc in second bump from hook, sc in next ten bumps*

Spider Body
Crochet Rows 1-11 of Tiny Crochet Ball with black yarn.

Before stuffing, attach or embroider eyes. Then attach legs, four on each side. Bury ends inside body.

Stuff and finish off with Row 12.

*Go into the bumps on the back of the chain, not the stitches on the front of the chain.

my farmers’ market tote is featuered in greencraft magazine!

Sorry about missing Thrifty Thursday yesterday. I was planning to take photos and write my post in the evening, and right before dinner I found a copy of GreenCraft in my mailbox. I knew something was up because I don’t subscribe to the magazine, but I did submit one of my patterns and a sample to the publication many months ago. I was so excited, I completely forgot about my thrifty pictures and post until after dark. Whoops!

green craft magazine farmers market tote

I am so thrilled to see my Farmers’ Market tote in GreenCraft magazine! I designed this bag using men’s dress shirts and a terry cloth towel for interfacing. It’s reversible because our Farmers’ Market runs from May to October: one side has Spring colors and the other has Fall colors. If you get a chance, check out the design and instructions in the Autumn 2010 issue!

stitch patterns: crochet washcloths

crochet cotton washcloths

My latest gift-giving obsession continues: fancy soap and washcloths. I know so many people who deserve a little bit of pampering, but are too busy to take time for themselves. Hopefully these will help them relax and wash their stress away. They are crocheted out of the super soft Aunt Lydia’s cotton.

Want to make some yourself? Here are the patterns.

Note: You’ll notice that I don’t chain at the beginning of each row. I’ve started using faux double crochets instead. They really make your edges much neater.

crochet cotton washcloths

Basket Weave
gauge: 4 stitches per inch, blocked to 10 inches
first stitch in each row is a faux double crochet instead of chain 3

  • Row 1: chain 40
  • Row 2: dc across
  • Row 3-6: *5 dc through the front post, 5 dc through the back post* repeat until 5 stitches left, 5 dc through the front post
  • Row 7-10: *5 dc through the back post, 5 dc through the front post* repeat until 5 stitches left, 5 dc through the back post
  • Repeat rows 3-10 four more times.

crochet cotton washcloths

Columns
gauge: 4 stitches per inch, blocked to 10 inches
first stitch in each row is a faux double crochet instead of chain 3

  • Row 1: chain 39
  • Row 2: dc across
  • Row 3: *4 dc, dc through front post* repeat until 4 stitches left, 4 dc
  • Row 4: *4 dc, dc through back post* repeat until 4 stitches left, 4 dc
  • Repeat rows 3-4 until you have a square.