remote control pillow pattern

UPDATE: Thanks to WhipUp for their link to my pattern!

When it comes to gift giving, it’s really hard to buy for my brother. Same with his girlfriend. They don’t have a lot of time for hobbies because they both work really hard at their jobs and at school. The only thing that is consistent with them is the Hokies. Something burgundy and orange usually goes over well, but how much VT gear can one really want? I decided to ask him. I told him to be honest. Do they both really love the Hokies that much? The answer was YES. So for his birthday, I made him this:

easy remote pillow pattern front

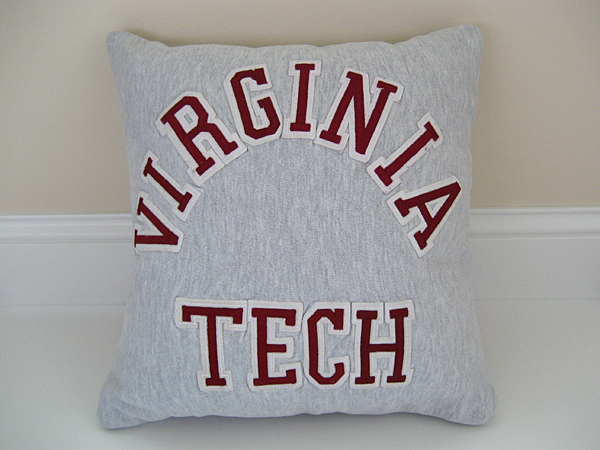
And that’s not even the cool part. Look at the other side:

easy remote pillow pattern front

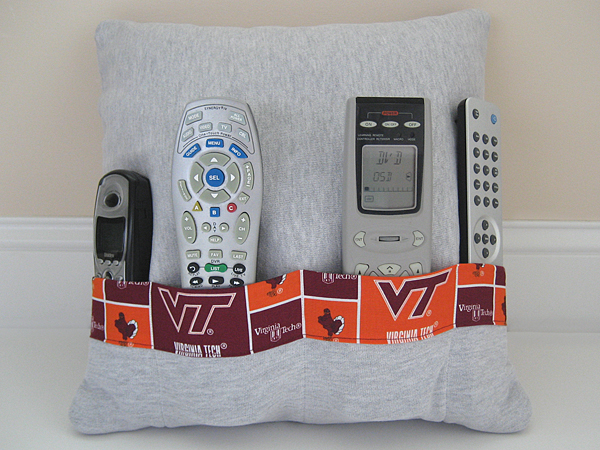
Because they are so busy with work and school, they wind up watching more games in their living room than down in Blacksburg. I figured a VT-themed remote control pillow would be perfect! What’s even better, I made this out of one of his old VT sweatshirts. He had handed it down to me a few years ago and it had been sitting in my closet for awhile. I figured I’d give it back to him new and improved!

I think this would be a cool gift to make for any sports junkie in your life. It would probably work just as well with a t-shirt. I’d just use a more substantial interfacing to give it structure. I’ve written up a pattern and you can download it here. Let me know if you make one! And as always, drop me a line if you have any questions.

easy kids shorts pattern

UPDATE: Thanks to the Craft Magazine blog for their link to my pattern!

I’ll say right up front, this isn’t an original idea. There are lots of tutorials on the web on how to make kids pants, like here and here. There’s also a cool how-to in The Creative Family.

I also need to note that my daughter really doesn’t need any more pants. She has plenty, and it’s too hot to wear them now anyway. So, I did the next best thing. I made her shorts! (Shhh… she has plenty of shorts, too. I just really wanted to sew these and was looking for an excuse!)

easy kid shorts

They turned out nice. The t-shirt fabric is from one of my old Gap shirts that has a little stretch to it. I didn’t make them too snug, and hopefully they’ll last through the rest of the season.

easy toddler shorts

I used a pair of her shorts as my pattern and traced them onto paper first. The template fits on an 8.5 x 11 piece of paper, so I figured why not share it with the blog world? You can download it here.

Drop me a line and let me know if you make a pair. I’d love to see a photo if you do! Also, this is my first attempt at writing a sewing pattern. Please let me know if something isn’t clear!

mini santa hat pattern!

Last year I tried knitting a little stocking for our knitting group’s ornament exchange and it turned out really wonky. The night before the exchange, I whipped up this little Santa hat instead.

santa hat

For this year’s exchange, I knit the stocking from Last Minute Knitted Gifts and it turned out MUCH better. Tana, who picked my Santa hat from last year, picked the stocking this year. I knit them both out of the same yarn. Too funny! I should see if I can complete her set with a mini sweater next season.

I’ve been thinking a lot about the little Santa hat ornament. It was so cute and easy! So the other night I decided to knit another one for our tree. I love it so much! Here’s the pattern so you can knit up some cuteness for your tree.

Knitted Santa Hat Ornament

Yarn: Lion Brand Micro Spun colors red and white
Needles: I used size 3 dpns
Gauge: 6 stitches = 1 inch
Time to complete: Less than two episodes of the Sopranos.

Hat

Using white yarn, cast on 30 stitches and divide evenly over 3 dpns.
Join and knit 8 rows in white (add rows if you need to so it forms a nice roll brim).
Change to red yarn and knit 12 rows.

Begin decreases:
Knit the first two stitches on each needle together.
Knit a plain round.

Repeat these two rows until you only have 3 stitches left. Tie them off.

Pom Pom

Start with a slip knot of white yarn on a single needle.
Knit in the front and back of the stitch, increasing to 2 stitches.
Knit in the front and back of both stitches, increasing to 4 stitches.
Repeat once more for a total of 8 stitches.

Begin decreases:
Knit two together across, decreasing to 4 stitches.
Repeat, decreasing to 2 stitches.
Repeat once more and tie off.

Pull the two ends together and shape a little ball. With a darning needle, thread the ends through the top of the hat and tie a knot.

If you want your hat to hang straight, string it up from the top. If you want it to have a little curl, like mine, string it up from the middle.

Hang on the tree and admire your craftiness. Merry Christmas!