how to: sew a reusable filter for cold brewed coffee

how to make an cold brewed coffee toddy filter

When I first moved to Lincoln, it was a no-Starbucks town. As I explored the local coffee shops for my daily iced latte, one of them recommended an iced toddy. It was love at first sip.

If you’ve never had cold brewed coffee, let me tell you it’s the most amazing thing ever. It’s less acidic than the hot stuff and therefore easier on your stomach. It also has a subtle sweetness that’s just about perfect, and I say that as someone who cringes at the thought of adding sweetner to a cup of joe.

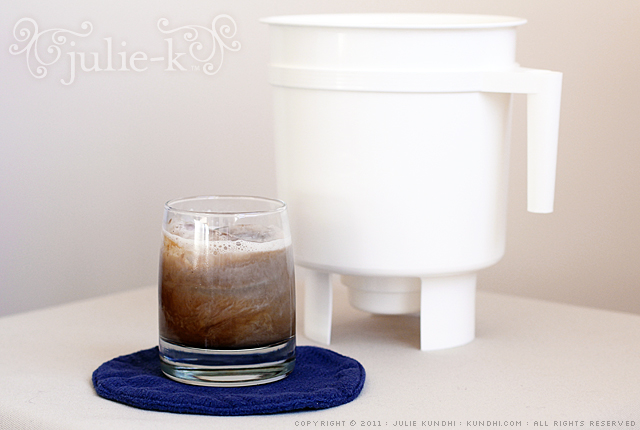
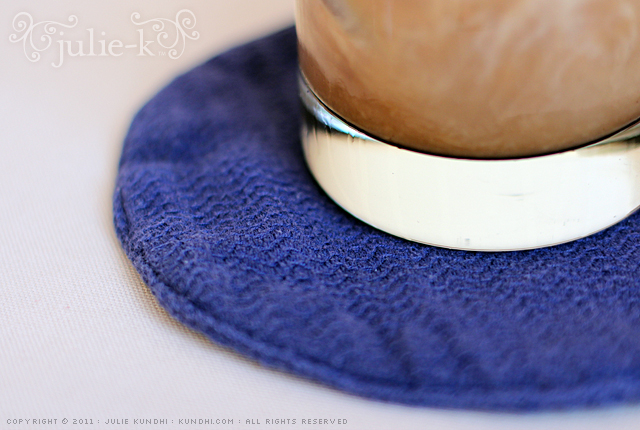
I immediately purchased a Toddy Coffee Maker so I could make decaf at home and drink it all day long. That’s only a slight exaggeration. My only frustration was the darn filter. They’re supposed to last a few months in the fridge, but mine were only making it through 2-3 brews. Then one day, the Pioneer Woman posted her recipe for The Perfect Iced Coffee and a lightbulb went off. I could make my own reusable filter!

how to make an cold brewed coffee toddy filter

Here’s how I did it:

  1. Grab a tea towel, the thinner the better.
  2. Fold in half and trace the top of the toddy maker as your pattern.
  3. Cut through both layers of the towel to get two circles.
  4. Sew circles together right sides facing, leaving a gap for turning.
  5. Turn right side out, tops titch around to close up the gap.

I’ve used this a few times and it works great. I just rinse off the grinds and throw it in the wash. If you cold brew at home, quit buying filters and make your own!

project details: I used the tea towels from my failed attempt at coffee grind dyeing, and yes, they’re still blue. I bought my toddy online, but a lot of local coffee shops carry them. Buy local if you can. Here is Ree’s recipe for the Perfect Iced Coffee. Note: I just use coffee and almond milk, but her concoctions sound sinfully delicious.

This is not a product endorsement or paid review. The Toddy folks have no idea who I am. I just love cold brewed coffee and dislike buying disposable filters.

finished: wagon wheel baby blanket

this moment

I am so excited this is finished because I’m really ready for a new project. It turned out just as beautiful as I had imagined the day I found the sweater.

this moment

I couldn’t wait for it to dry, so I took pictures while it was blocking. I don’t normally block blankets, but because this is a gift, I wanted all of the squares to look perfect.

this moment

Some friends have asked me about my seaming technique on this blanket. I took pics along the way so I can post a tutorial. My next blanket will be joined as I go. Maybe it won’t take so long to finish.

original post: You can see parts of the original sweater in my first post about this project.

easy kids bike shorts pattern

wardrobe refashion

The bike shorts pattern is finished and ready for download! It’s been over two years since my original Easy Kids Shorts pattern and I do a few things differently now.

  • These days I sew the inseams first, then the rise.
  • I almost always use a 1/4 inch seam allowance instead of 1/2 or 5/8 inch, usually because I’m trying to squeeze as much as I can out of a piece of fabric or t-shirt.
  • 3/4 inch elastic seems to be more comfortable around the waist than the smaller widths.
  • Now that I have a serger, I finish my raw edges and just fold the waist over once. You can finish your edges with a zig zag/overlock edge or adjust the pattern to accommodate the double fold waist.

I recommend you pay attention to the type of knit fabric you use. The original piece I traced for this pattern was a tightly-knit jersey. The t-shirt I used was a loosely-knit jersey and the shorts turned out a little big. Not big enough to re-sew, but definitely roomier.

Finally, my daughter is long and lean: 20 inch waist and 14 inches from waist to knee. Adjust seam allowances and elastic size to get a better fit for your child. Want them shorter? Trim off the bottom of the pattern an inch or two.

Please leave any questions in the comments. Download the pattern here. Enjoy!

wardrobe refashion: t-shirt to bike shorts

wardrobe refashion

My daughter loves wearing dresses. She also loves to climb tall jungle gyms and roll around in the grass with her feet in the air. She understands the concept of modesty, but she’s too busy running, jumping and playing to be worried about such things right now. I get it. I want her to have fun and not be self conscious. So the new rule: bike shorts under dresses.

A few years ago, I posted a pattern for easy kids shorts. I followed the same basic steps to come up with the bike short pattern. I had also planned to share the template with you, but it’s gone missing. Whoops!

I have a few more to make, so I guess I’ll be redrawing the pattern. I’ll let you know when it’s posted. In the meantime, I’ll be outside teaching my daughter how to do cartwheels.

stash: One of my t-shirts rescued from the donation bag. Thrifted elastic.

A seriously fast, easy and inexpensive project. Plus, they go under a dress, so they don’t have to be perfect!

my creative space

this moment

In my creative space today I’m working on the border for the wagon wheel baby blanket. It’s been almost a year since I started this project. Yikes! I really lost momentum when it came to seaming the squares.

Now they’re all together and the first round of the border is finished. I’m just hdc-ing around until I run out of black yarn, which was reclaimed from a different sweater. I hope to have a finished pic very soon!

What’s in your creative space? Join in the fun here!

re-refashioned tote bag

More sewing! I’m on a roll!

A few years ago I refashioned this conference tote bag* with an old t-shirt. I used it until poor Siouxsie started to get holes. Amazingly, the canvas tote underneath showed practically no wear. I think it might be indestructible.

refashioned conference tote bag

So I re-refashioned it. I have another black tote and I’m thinking of making a set. I really love this fabric.

refashioned conference tote bag

*Wow. Did you click on that link? My blog photos have really improved over the past few years!

progress: thrifty buffet gets paint

Remember the thrifty buffet we found a few months ago? It had been sanded and primed then pushed to the side when our weekends got busy. Yesterday, my husband pulled it out and started painting.

thrifted painted wood buffet

The primer is gray and the paint is chocolate brown. I think he was hoping for a darker, espresso color. We’ll see what it looks like after coat number two.

thrifted painted wood buffet

my creative space

side zipper creative space

This space hasn’t been very creative in the past week. I’ve been sick since last Saturday. I’ve spent a lot of time sleeping and not much else.

Right before that I had made a trip to the thrift store and started work on some summer refashioning. I also drafted a skirt pattern from scratch and made this muslin. Notice what’s on the side? A zipper! I’m not sure why I’m so intimidated by these buggers, but I’m going to conquer that fear this summer. So long elastic waistbands!

pattern: I used the a-line skirt formula in Sew What! Skirts. Muslin fabric is a floral sheet.

More creative spaces here.

how to: personalize end-of-year teacher gifts
in 3 easy steps

tutorial fabric marker artwork on sewing gifts

Ok, so this really could be a how to: personalize any gift. It’s just that I really wanted to get my daughter involved with her teacher thank you gifts this year and this was all her idea.

She had been playing with a fabric gift card sleeve of mine and asked if we could make something similar for her teachers for “receipts and stuff.” She also wanted to decorate it herself.

You could do this with any fabric gift: zipper pouch, bookmark, you could even buy some blank canvas tote bags from the craft store. The important thing is to get your child involved!

Materials
In addition to your project supplies, you’ll need:
-disappearing ink pen
-fabric markers

Step 1
With your disappearing ink pen, mark off the area where your child can draw. It’s ok if she wants to draw outside of the lines, just make sure that the most important artwork is in the marked area.

Step 2
Let her go to town! When she’s finished, follow the directions on your fabric markers. Mine did not require heat to set the ink, but it did recommend two coats of ink. I traced over her lines after she went to bed.

Step 3
Sew up the gift!

tutorial fabric marker artwork on sewing gifts

What surprised me most about this project was how specific my daughter was for each drawing. Sueann received a picture of a treasure map (something she saw at school) with X marks the spot at a heart-shaped rock. Lorie received flowers (it was nature school—makes sense). Diane received a picture of “things falling” (not sure about that one—neither was Diane). They were all so different! She made sure I put a tag on each gift so it went to the correct teacher.

stash: I wish I thought to put a note about all of the recycled textiles that went into this gift. Nature school teachers are all about reusing. The fabric was thrifted and the zippers were recycled from other textiles. I wish I took a pic of the insides. She picked out different linings for each teacher, too!

silky eye pillow

A few nights ago I sat down in front of the tv and couldn’t find anything to watch. My daughter was already in bed and my husband was downstairs working out. I decided to flip through some of my craft books for an easy project. I was really tired so it had to be really easy.

silky eye pillow amanda soule handmade home

I found the perfect project in Handmade Home: a silky eye pillow scented with chamomile and lavender. I had it finished and ready for the stuffing in no time. The next day I bought the herbs, came home and made a few more.

silky eye pillow amanda soule handmade home

stash: I had everything I needed in my stash except for the herbs. A quick online search showed that most people used flax for the stuffing. I had a big bag of sushi rice in the pantry and the small round grains worked perfectly.