how to: color your own chenille sticks

color your own chenille stick pipe cleaner

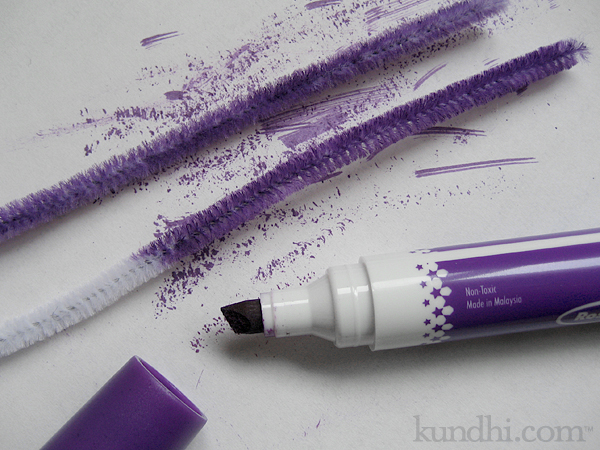
I’m not sure this is really a “how-to” or more of a crafty public service announcement. We recently had a purple pipe cleaner emergency in our house. (Does anyone else have trouble calling them chenille sticks?)

The project was a rainbow with a pot of gold. We had every color of the rainbow except purple. I suggested we go ahead and make the project and fill in the missing color later. Our Artist in Residence balked at that idea. How can you make a rainbow without purple? Details, Mama, details!

So, in an act of desperation, I grabbed a white pipe cleaner and a permanent purple marker. A Sharpie probably would have been best, but all I had was a dry erase marker. It worked remarkably well: I just colored it, waited about a minute and wiped it down with a tissue to make sure it was dry. Crisis averted!

melted crayons : take two

mini muffin tin crayons

It had to happen sooner or later. I melted my silicone crayon mold. I guess even silicone can’t handle melting and freezing wax over and over. Luckily I was keeping an eye on things and turned it off before it got really messy.

I kept my eyes peeled at the thrift store for another one. I liked using the microwave because it seemed silly to heat up the oven for just a few crayon shapes. Instead, I found a little mini muffin tin. So mini that it fits in my toaster oven. I didn’t even know something this small existed. I got some mini muffin papers and made my first batch last week. LOVE THEM.

The one thing that I didn’t like about the hearts is that they were a little too cutesy for boys. I’d been giving them as small gifts with handmade journals to some of my daughter’s friends, but boys her age are more into Hot Wheels. The mini muffin shapes are a little more gender neutral.

They take a little bit longer than in the microwave, but I really like not having to heat the whole kitchen to make crayon shapes. My little tin was a definite thrift store score.

my creative space

handmade train applique

In my creative space today, I’m getting in the rhythm of seaming square after square (after square…). I know I could have crocheted these together as I went along, but I want that nice patchwork-y square look. Plus, it’s always nice to play around with color combinations before putting them together.

What’s in your creative space today? Kirsty is up to something with coffee. I hope it turns out better than my coffee project. Don’t forget to check out all of the lovely spaces while you are there.

the little engine that could : season three

handmade train applique

I know I’ve complained about this before, but why do manufacturers make train, car and dinosaur shirts so gender specific? My daughter loves all three and she loves red, pink and purple. I hit the jackpot a few years ago when I found a white, new with tags, gender neutral train shirt at a garage sale. It was a size too big, but she wore it all the time with her sleeves rolled up. The next year it fit perfectly.

This year, it’s too small. I suggested maybe we pass it on to one of her friends who loves trains. “But Mama, can’t we just sew the train on to another shirt?”

I put this project off, but she kept bringing it up. I may be finished with it, but my daughter isn’t ready to give it up. In fact, she art directed the whole project, choosing the pink shirt and suggesting the border. After she got over her disappointment that I didn’t have any pink ric rac in my stash, she picked blue to match the puffs of steam.

She’s very proud of her new shirt. I’m happy that she’s happy. I think this might be the season finale for this little engine, though. After this, it’s going on a tote bag.

project details: I positioned the ric rac in place with a glue stick before stitching it on, which allowed me to fudge the corners so they matched. Worked like a charm! Also, I didn’t fold over the ends. Just lined them up and sealed them with a little bit of fray check.

almost two years ago: My tutorial on ruffling up a boy’s t-shirt. I wish this would have worked for the train shirt, but my daughter is growing too fast!

behind the scenes: I’m finally seaming the baby blanket. Can’t wait for the big reveal!

tea towel apron

tea towel apron

This tea towel was spared from the coffee experiment. I’ve been planning to turn it into an apron ever since I saw the project in Amy Karol’s first book. I love how it turned out, especially the pleats. I can’t wait to make more! Here’s a view of the tie.

tea towel apron

project details: This towel was part of a wedding gift. I’m so glad to give it a new life in the kitchen. Tie was in my stash from who knows where. Pattern from Bend-the-Rules Sewing.

coffee update: I took Happy Cat’s advice and re-brewed the grounds after my coffee yesterday. The towels have been soaking for over 24 hours and are still blue. I think they are made of kevlar.

thrifty find: new buffet!

thrifty find

It may have been a dresser in its past life, but I’ve got a new buffet, baby!

We’ve been looking for some kind of additional storage in our kitchen/dining area for months. I found this one at the thrift store this morning. It’s a little rough around the edges, but I think a coat of dark brown paint and new brushed nickel knobs will make it perfect.

The measurements for our space are also ideal. And it’s wood! Not particle board! It’s just right in so many ways. What a great start to the weekend!

Hope you have a great weekend, too!

p.s. The dishtowels from yesterday are still blue. Boo.

got a project brewing, literally

dyeing fabric with coffee grinds

I love these tea towels. They matched the kitchen in my old house. They’re super soft. They are the best tea towel fabric ever. They’ve even been burned a few times, which explains the holes here and there. But I love them and I had this crazy idea to make them work in my current kitchen. I’d trim off the holes and dye them brown. Even crazier, I’d dye them with coffee.

Tutorials online say you should use fresh brewed coffee. That just seems like a waste of perfectly good coffee to me. Coffee is for waking up, jump starting your afternoon and finishing off a fancy meal. It is not for dyeing fabric.

So I used coffee grinds. And they are still soaking. And they are still blue. I’m going to let them sit overnight. I’ll keep you posted.

fused plastic grocery bag lunch bowl

fused plastic grocery bag lunch bowl

So here’s the plastic bag project that feels like it’s been taking forever to finish. Some history on the idea: my husband has started taking salads to work. He throws everything into a plastic zipper bag* for easy transport, but said it’s not very easy to eat out of the bag.

fused plastic grocery bag lunch bowl

I thought some kind of bowl would help. Something stiff enough to stand up straight, but forgiving enough to be smooshed in a lunch bag. With this one, you just drop the zipper bag in and fold the edges over the bowl. It’s kind of deep, but salad greens take up a lot of room. I have a feeling I might need to adjust it after he tries it out.

fused plastic grocery bag lunch bowl

Some interesting things I learned while playing around with this project:

  • Target uses different kinds of plastic for their bags. They may look the same, but they don’t melt the same.
  • Parchment paper works much better than regular paper.
  • Measure twice, sew once. Ripping out stitches leaves holes!
  • I need some more project ideas to use up the leftover fused plastic.

stash: All of these bags came from my pantry. No matter how hard I try to bring my reusable grocery bags to the store, forgetting them on just one trip leaves me with a bunch of plastic bags in my pantry. I usually just recycle them, but this was kind of fun. I might keep on fusing them.

*Still trying to figure out how live without some plastic bags. We wash and reuse our plastic zipper bags until they practically fall apart. I wonder how they would fuse together. Hmmm…

almost finished: baby blanket

baby blanket squares

I’m thinking this blanket would be finished already if I didn’t rip out and redo so many of the squares. My nephew was born last week. Thank goodness this is a nice, lightweight cotton yarn. I think it will make a perfect blanket for Spring.

I need to think about yarn for the border. I won’t have enough of any one color to make it all the way around. Would a multicolor border be weird or fun?

my creative space

fused plastic bags

In my creative space today I’m fusing plastic grocery bags. Am I the only crafty person on the planet who hasn’t tried this yet? So far, I’ve had mixed results. I think it might be worth the extra effort to spring for some parchment paper.

Play along with your creative space over at Kirsty’s blog.