wardrobe refashion: denim skirt makeover

denim skirt refashion

This is the original skirt I was going to wear last weekend. It turned out a little too casual for the event. I was planning on wearing it with black tights and boots. Now I’m wondering if it might look better with a t-shirt and sandals.

I really hacked this poor thing up. I cut off the bottom two ruffles and took it in on either side, trying to make it more a-line and less Holly Hobby. (Not that there is anything wrong with HH. It’s just not a good look on me.)

denim skirt refashion

It’s been a long time since I’ve refashioned something. I can’t wait to dive into the stack of clothes that have been waiting patiently by my sewing machine.

refashion: This was an impulse buy at a garage sale last summer. I think it cost 75 cents. I’m hoping to use the leftover ruffles to lengthen some of my daughter’s jeans.

how to make microwave crayon shapes in 3 easy steps

microwave heart crayons

Maybe I should call these Really Lazy Crayon Shapes. I’d been thinking of making them for awhile, but all of the tutorials I found online suggested baking in the oven, melting over a double boiler or melting into cups and pouring into molds. Those were just too many steps for me.

I found a silicone mold at the thrift shop for only a few bucks, so I wasn’t too concerned if I ruined it. I threw all caution to the wind and microwaved the crayons directly in the mold. It was simple, fast and easy to clean up.

microwave heart crayons

Materials
crayon bits
silicone mold
knife
toothpick

Step 1
Put your crayon bits directly in the mold. Break up any bits that are too big with a knife.

Step 2
Microwave on high for 1-2 minutes. (I’m sure times will vary based on microwaves. Watch your first batch carefully!) Use a toothpick to stir if your bits aren’t melting evenly.

Step 3
Allow to cool and then pop them out of the mold. I put mine outside because we’re having a frigid winter and it didn’t take long, but you could stick them in the freezer, too.

Clean up: Put some water in the mold, microwave it for about a minute and dump it out. The crayon residue wipes out easily with a paper towel.

*After searching, I found that my mold is actually an ice cube tray and shouldn’t be exposed to heat. It held up just fine, but I wouldn’t use it for ice cubes or food after heating just to be safe.

recycle: This is a great way to use all of those crayon bits that are too small for little hands to hold.

how to add adjustable elastic to kids’ pants in 5 easy steps

adjustable elastic kids pants

My daughter is growing like a weed, except she’s only growing up, not out. She’s got 4-5T legs and a 3T waist. That means that most of the pants we find that are long enough won’t stay up.

I try to only buy pants with an adjustable waist, but sometimes I come across a great deal or something super cute that I just can’t pass up. I decided to try adding elastic myself, and you know what? It’s super easy!

You can even do this without a sewing machine as long as you don’t mind a little hand stitching.

Materials
button hole elastic
small, sharp pair of scissors
two buttons that fit through your elastic
Fray Check
needle and thread

Step 1
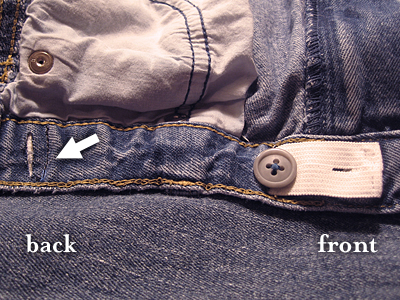
Starting on the right inside of the waist, snip two holes to create a casing for the elastic. Make sure your scissors don’t go through to the other side! Apply Fray Check to the raw edges.

adjustable elastic kids pants

Step 2
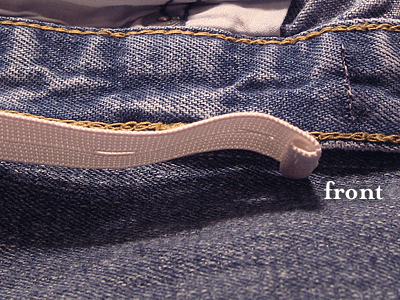
Cut a piece of elastic that’s about one inch longer than between your holes. Fold one edge over and sew. This is the edge you’ll be using to adjust the pants.
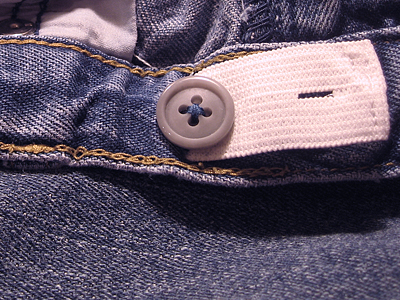
adjustable elastic kids jeans

Step 3
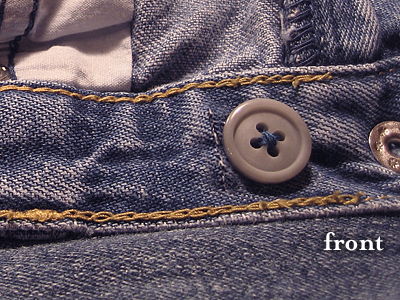
Sew a button in front of the casing you’ve created.

button hole elastic

Step 4
Thread the elastic through the waist casing with the finished edge going through the front. You can tuck the unfinished edge into the back.
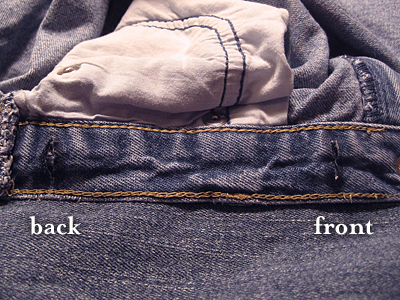
adjustable elastic kids jeans

Step 5
Sew a line of stitches to secure the elastic. See arrow.

adjustable elastic kids pants

Here’s what you’ll see on the outside of the pants.

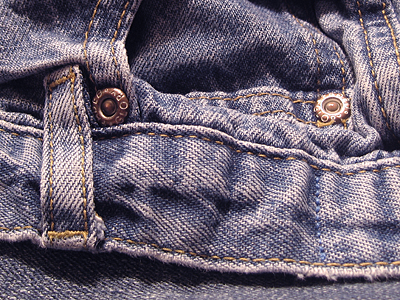
Repeat on left inside of the waist.

refashion: The only thing worse than sizing for women’s pants is sizing for kids’ clothes. At least with this little trick, I can just make sure pants look long enough when I buy them. It’s nice knowing how easy it is to adjust the waist. Maybe I should try this on my jeans!