how to make a cat costume in 3 easy steps

black cat costume

I tried to be proactive this year and started the Halloween costume conversation at the beginning of October. My daughter insisted she wanted to be Abby Cadabby again. I encouraged her to try a different costume and brought it up several times. Nope. She was sure. Abby Cadabby.

So I bought her a bigger pair wings because what I threw together for her last year was just too small. A few weeks later she casually mentioned that she wanted to be a cat. And then she couldn’t decide between the two. After a week of indecision, I finally made a tail and some ears and said, “Great news! You’re going to be a cat for Halloween!”

A cat is a great last minute costume, especially if you have all the materials in your stash. And it’s not just great for kids. The tail is long enough for a mama cat, too!

Step 1
Look through your child’s wardrobe for a monochromatic outfit. My daughter could have been a brown or black cat. I chose black.

Step 2
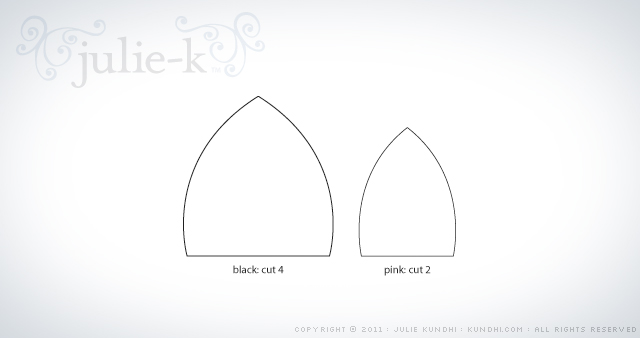
Make some ears. I cleaned up my rough pattern for you. When printed, the larger piece should be 2 1/2 inches tall. Sew pink to black, then black to black. Stuff with a little bit of fiber fil if you like, then stitch onto a headband. (I used a Goody Slide Proof Headwrap.)

black cat costume

Step 3
Make a tail. I used black flannel from my stash and cut a three inch wide strip from selvedge to selvedge. Sew up the sides, turn right side out and stuff. Sew a loop of elastic the size of your child’s waist to the selvedge ends.

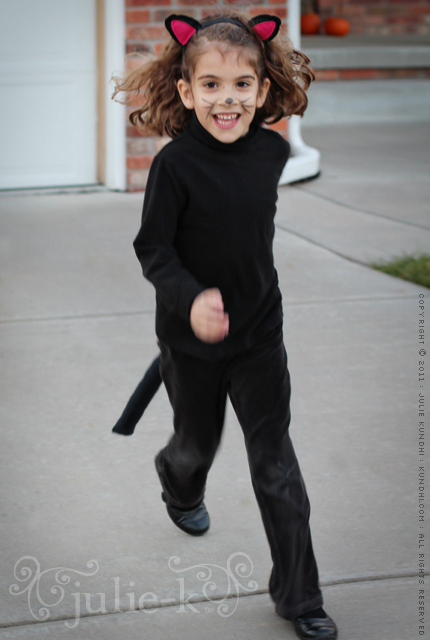
That’s it! It took less time to make the costume than it did for my daughter to decide what she wanted to wear. The only thing I had to buy was the liquid eyeliner for her nose and whiskers. I think I’ll use it for some cat eyes on myself tonight.

I’d love to see what you are making for Halloween this year. Share a link in the comments!

birthday superhero cape

My daughter’s friend Mason loves Batman. We got him some superhero books for his birthday, but they didn’t seem fun enough. I thought maybe a special cape would make his gift more exciting.

reversible superhero cape

I found some black and red canvas-like fabric in my stash that I thought would be great for this project — wrinkle resistant and durable. Apparently, it’s Ultra Heat’n Bond proof, too. I wound up stitching on the appliques and gunked up my needle in the process. Bah!

The cape is reversible and I toyed with the idea of adding a Husker N or Mason M on the other side. His mom suggested Spiderman. Of course, it wasn’t until after I finished that we both realized Spidey doesn’t wear a cape. Oops! I spent a lot of Saturday mornings watching Super Friends. I should have known that!

reversible superhero cape

Anyway, I’ve always wanted to make a cape and now I have. And of course, after all of that, he was more interested in the books. Kids. Gotta love them!

cape tutorial: I used Georgia Leigh’s free cape tutorial and freehand sketched the pattern onto my fabric. She also has applique stencils available. I traced my own because I wanted the Batman logo to match the new Dark Knight logo that was on one of the books.

unblocked crochet projects

unblocked crochet projects

I’ve been hooking up a storm lately. I finished this scarf and I’m using up the extra bits to make a bookmark. I’ve also started a new scarf that’s almost done. I’m not sure what’s gotten into me. Maybe it’s the cool Autumn weather?

I can’t wait to block the scarf for a final reveal. It’s going to be so beautiful!

What are you working on this week?

after: hello kitty lunch bag + some helpful tips

lunch bag refashion

So, I survived this crazy project. Actually, the only thing that was really difficult was the bias trim, especially around the corners. But I’m not very good at bias trim to begin with, so there’s that.

I was surprised how easy this insulated-plastic-foil material is to sew. I picked out the original trim stitches and all of the pieces fell apart. I cut everything down to size and serged around all of the edges, then I serged the pieces back together. I know that sounds like overkill, but the material was made up of three layers and I didn’t want manipulate six layers of slippery stuff when I did the trim.

Some very important things to keep in mind for a project like this:

  • Remind yourself how much you love your child. I found this especially helpful sewing around those corners with the trim.
  • Have a friend close by via text for encouragement. Send her pictures of your bent sewing machine needle just for fun.
  • Keep chanting the mantra: It doesn’t have to be perfect, it just needs to make my child happy.
  • Embrace your organic style as breaking the rules and your wonky stitches as a design element.
  • Remind yourself that some kid in China probably put this together the first time. If she could do it, so can you.
  • Let go of the little things, like matching the black and pink trim in the handle. It’s just another design element.

That’s about all I’ve got to say about this lunch bag. My daughter loves the pink and she stuffed it in her backpack this morning with no problem.

stash: Finally digging into my thrifted stash of bias trim. It’s about time!

wardrobe refashion: t-shirt to bike shorts

wardrobe refashion

My daughter loves wearing dresses. She also loves to climb tall jungle gyms and roll around in the grass with her feet in the air. She understands the concept of modesty, but she’s too busy running, jumping and playing to be worried about such things right now. I get it. I want her to have fun and not be self conscious. So the new rule: bike shorts under dresses.

A few years ago, I posted a pattern for easy kids shorts. I followed the same basic steps to come up with the bike short pattern. I had also planned to share the template with you, but it’s gone missing. Whoops!

I have a few more to make, so I guess I’ll be redrawing the pattern. I’ll let you know when it’s posted. In the meantime, I’ll be outside teaching my daughter how to do cartwheels.

stash: One of my t-shirts rescued from the donation bag. Thrifted elastic.

A seriously fast, easy and inexpensive project. Plus, they go under a dress, so they don’t have to be perfect!

ladybug water bottle carrier

water bottle carrier

Yes! I did a little bit of sewing!

The heat wave has passed, but it’s still hot. (It is Summer, after all.) My daughter has a few days left of camp outside, so I got her a small water bottle to take along. I couldn’t imagine her carrying it around without leaving it somewhere, so I whipped up a little carrier for her.

“It’s not a water bottle carrier, Mom. At camp they just call it a bottle carrier.”

Whatever. I made one of these awhile back and it came out kind of snug. I added generous seam allowances to this one and it’s a little big. Maybe if I make third one it will fit just right.

And yes, it matches her neck cooler. She’ll be super coordinated next year at the Kearney Cruise.

resources: I really did wing this, but not before checking out tutorials by Pink Chalk Studio and The Long Thread.

my creative space

side zipper creative space

This space hasn’t been very creative in the past week. I’ve been sick since last Saturday. I’ve spent a lot of time sleeping and not much else.

Right before that I had made a trip to the thrift store and started work on some summer refashioning. I also drafted a skirt pattern from scratch and made this muslin. Notice what’s on the side? A zipper! I’m not sure why I’m so intimidated by these buggers, but I’m going to conquer that fear this summer. So long elastic waistbands!

pattern: I used the a-line skirt formula in Sew What! Skirts. Muslin fabric is a floral sheet.

More creative spaces here.

how to: personalize end-of-year teacher gifts
in 3 easy steps

tutorial fabric marker artwork on sewing gifts

Ok, so this really could be a how to: personalize any gift. It’s just that I really wanted to get my daughter involved with her teacher thank you gifts this year and this was all her idea.

She had been playing with a fabric gift card sleeve of mine and asked if we could make something similar for her teachers for “receipts and stuff.” She also wanted to decorate it herself.

You could do this with any fabric gift: zipper pouch, bookmark, you could even buy some blank canvas tote bags from the craft store. The important thing is to get your child involved!

Materials
In addition to your project supplies, you’ll need:
-disappearing ink pen
-fabric markers

Step 1
With your disappearing ink pen, mark off the area where your child can draw. It’s ok if she wants to draw outside of the lines, just make sure that the most important artwork is in the marked area.

Step 2
Let her go to town! When she’s finished, follow the directions on your fabric markers. Mine did not require heat to set the ink, but it did recommend two coats of ink. I traced over her lines after she went to bed.

Step 3
Sew up the gift!

tutorial fabric marker artwork on sewing gifts

What surprised me most about this project was how specific my daughter was for each drawing. Sueann received a picture of a treasure map (something she saw at school) with X marks the spot at a heart-shaped rock. Lorie received flowers (it was nature school—makes sense). Diane received a picture of “things falling” (not sure about that one—neither was Diane). They were all so different! She made sure I put a tag on each gift so it went to the correct teacher.

stash: I wish I thought to put a note about all of the recycled textiles that went into this gift. Nature school teachers are all about reusing. The fabric was thrifted and the zippers were recycled from other textiles. I wish I took a pic of the insides. She picked out different linings for each teacher, too!

silky eye pillow

A few nights ago I sat down in front of the tv and couldn’t find anything to watch. My daughter was already in bed and my husband was downstairs working out. I decided to flip through some of my craft books for an easy project. I was really tired so it had to be really easy.

silky eye pillow amanda soule handmade home

I found the perfect project in Handmade Home: a silky eye pillow scented with chamomile and lavender. I had it finished and ready for the stuffing in no time. The next day I bought the herbs, came home and made a few more.

silky eye pillow amanda soule handmade home

stash: I had everything I needed in my stash except for the herbs. A quick online search showed that most people used flax for the stuffing. I had a big bag of sushi rice in the pantry and the small round grains worked perfectly.