the little engine that could : season three

handmade train applique

I know I’ve complained about this before, but why do manufacturers make train, car and dinosaur shirts so gender specific? My daughter loves all three and she loves red, pink and purple. I hit the jackpot a few years ago when I found a white, new with tags, gender neutral train shirt at a garage sale. It was a size too big, but she wore it all the time with her sleeves rolled up. The next year it fit perfectly.

This year, it’s too small. I suggested maybe we pass it on to one of her friends who loves trains. “But Mama, can’t we just sew the train on to another shirt?”

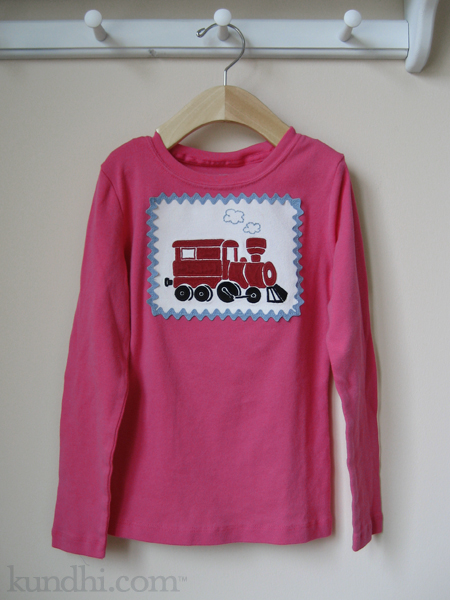
I put this project off, but she kept bringing it up. I may be finished with it, but my daughter isn’t ready to give it up. In fact, she art directed the whole project, choosing the pink shirt and suggesting the border. After she got over her disappointment that I didn’t have any pink ric rac in my stash, she picked blue to match the puffs of steam.

She’s very proud of her new shirt. I’m happy that she’s happy. I think this might be the season finale for this little engine, though. After this, it’s going on a tote bag.

project details: I positioned the ric rac in place with a glue stick before stitching it on, which allowed me to fudge the corners so they matched. Worked like a charm! Also, I didn’t fold over the ends. Just lined them up and sealed them with a little bit of fray check.

almost two years ago: My tutorial on ruffling up a boy’s t-shirt. I wish this would have worked for the train shirt, but my daughter is growing too fast!

behind the scenes: I’m finally seaming the baby blanket. Can’t wait for the big reveal!

tea towel apron

tea towel apron

This tea towel was spared from the coffee experiment. I’ve been planning to turn it into an apron ever since I saw the project in Amy Karol’s first book. I love how it turned out, especially the pleats. I can’t wait to make more! Here’s a view of the tie.

tea towel apron

project details: This towel was part of a wedding gift. I’m so glad to give it a new life in the kitchen. Tie was in my stash from who knows where. Pattern from Bend-the-Rules Sewing.

coffee update: I took Happy Cat’s advice and re-brewed the grounds after my coffee yesterday. The towels have been soaking for over 24 hours and are still blue. I think they are made of kevlar.

nature hike tote bags

capri pants turned into totes

You knew I was going to turn those capri pants into tote bags, didn’t you? Not just any bags, however, but bags with a purpose: keeping nature out of my pockets and my purse.

I’m sure many of you can relate to this: Mama, can you hold this rock? Here’s a present for you, Mama. It’s a leaf! I’m just going to put this stick in your purse for later. Did you put my feather in your pocket? Later, as you are digging around for latte money, the barista gives you a funny look as random bits of nature fall on to the counter.

I made two of these: one for my daughter and one for her friend. They’re the same except for the lining. Now when we go on walks together, the girls can carry their own bits of nature. There are all kinds of pockets perfect for acorns, rocks, twigs and leaves. The buttoned back pocket is perfect for storing a shovel. You never know when you’ll need to dig for treasure!

I love how these turned out and will be making more. How perfect would they be for a day of garage sailing or thrifting with different compartments for cash, phone, water and a snack! They would also make a cool craft project bag with pockets for all of your notions.

project details: Pants from my closet, lining fabric from my thrifted stash.

finished: red comfy shorts

wardrobe refashion comfy sweat shorts

These poor shorts have been sitting in my pile for a long time (note the wrinkles). I made these just like the first pair,* but this time I tried to add pockets. It didn’t go so well. I figured they were ready for the donate bag, but my husband said they fit great. It was just the pockets that were goofy. So I stitched them closed and cut the pockets out.

This was my only project out of the The Big To-do Pile this week. I’ve been working on a few gifts that I’ll be posting next week.

What did you finish this week?

*I just re-read my first comfy shorts post. This had me laughing: “I think with the small amount of sewing with knits that I do, I really don’t need a serger.”

finished: twirly skirt

twirly skirt mending

This week’s Finished on Friday project was just a little bit of mending. I received this skirt from a friend. It didn’t need that much work: just hem the raw edge and sew a button on for the adjustable elastic. I wish I would have done it sooner, though. My daughter LOVES it. She wore it two days in a row and would have worn it a third if I had let her.

Not much else noteworthy out of The Big To-do Pile, but I’m patting myself on the back for keeping my weekly project goal.

What did you finish this week?

how to adjust the waist of your pants/jeans in 4 easy steps

My “Finished on Friday” project this week has turned into a tutorial. I think you are going to love it. I had written a similar tutorial about a month ago complete with pictures. Something just didn’t feel right about it, though. I figured there must be an easier way to tackle this problem. Then I found a great fitting pair of jeans at the thrift store. The secret: a “comfort elastic waistband.” See how the elastic is incorporated around the entire waist?

take in pants jeans at the waist

Then my friend Amy commented on my frustrations taking in the waist on these pants. “When I have encountered that I sometimes just open the side seam in the waistband area and thread new elastic right over the old.”

Aha! Remember my adjustable elastic tutorial? This is kind of the same, but better. The elastic goes around the entire waist, so there’s no bunching up in any one place. The fabric is evenly distributed for a smoother finish.

You can even do this without a sewing machine as long as you don’t mind a little hand stitching.

take in pants jeans at the waist

Materials
3/4″ or 1″ wide elastic
small, sharp pair of scissors
Fray Check
pin, needle and thread

Step 1
Snip two holes on either side of the waist to create a casing for the elastic — one just inside the buttonhole/snap and the other just inside the button/other snap. Make sure your scissors don’t go through to the other side! Apply Fray Check to the raw edges.

Step 2
Thread the elastic through the casing and secure with stitches on one side. (My thread matched the denim a little too well. The arrow is pointing to the stitches. If you look really close, you’ll see them.)

Step 3
Try on pants and pull on the elastic until you’ve got a good fit.

Step 4
Pin elastic in place, take off pants and secure with stitches on the other side. Trim excess elastic.

That’s it! Totally easy! You can do this to any pants that:

  • fit your hips, but are too big in the waist
  • fit everywhere except that annoying gap in the back
  • are made of denim without that 2% of spandex to make then snap back into shape after one wearing
  • need to tide you over while you lose weight and fit into the next size

wardrobe refashion: puppy nightshirt

This nightshirt used to be a pair of pajamas. Repeated washings have caused them to shrink, but instead of getting smaller all over, they got shorter and wider. I tried to convince my daughter they were ready for the donate pile, but the “doggie pajamas are her most favorite.” She asked me if I could turn them into a nightshirt like her Mickey pajamas.

pajamas turned nightshirt

Since they were so wide, all I had to do was remove the elastic waistband, sew the pant legs into a tube, and attach them to the shirt. I added a rolled hem to the raw edge of the waist to match the shirt for a little more ruffle action: pink hem original, green hem mine.

pajamas turned nightshirt

technical note: I had a serious problem with skipping stitches on this project, no matter what my tension, regular or ball point needle, even different thread. When I switched to a muslin scrap the stitches were fine. I figured it must be the fabric so I tried putting a piece of paper tissue under the presser foot. It worked like a charm and the tissue tore away easily. I’m not sure where I first read this idea, but I’m glad I remembered it!

wardrobe refashion: I don’t think the life of these pajamas really need to be extended much longer. We’ve had them awhile and they are well loved. I’m curious how long they’ll last in their new form.

home ec class: hemming jeans

home ec class how to hem a pair of jeans

I haven’t abandoned my home ec class. I keep looking at the projects hoping to steal a bit of time here and there to finish some more up. This one was a necessity. When my daughter tore a hole in her best-fitting pair, I had to face the pile of size six jeans that are too long. It’s a big pile.

I knew I was going to have to hem most of them, but since she’s growing so fast, I decided to only do a few at a time.

I picked an easy pair to start with: straight leg. I only broke one denim needle — my machine’s motor is definitely not a match for that side seam. I stopped and started on either side and hand stitched that part of the hem.

I’m pretty impressed with how they turned out. The real challenge will be tackling flare and boot cut styles.

refashion: I like how the original hem is retained with this technique. They don’t have that “my mom hemmed these” look to them. I have a feeling that I’ll be using this skill a lot in the coming years.

bee’s knees denim knee patch

denim flower patch applique

A few weeks ago, my daughter fell and skinned her knee. Her knee healed fine, but her pants not so much. We love these jeans. They fit her really well, which is rare. She asked me to fix them, so I put them in the pile for the craft retreat. I was planning a boring patch, but the collection of creative minds turned it into something special and cute.

me: I’m just going to do a patch with some denim and heat-n-bond.
crafty friend #1: Why not cut some cute shapes with the BIGkick?
me: Hmm… that would be cool.
crafty friend #2: Are you going to stitch around the edges?
me: I don’t think so. How would I get it under the presser foot?
crafty friend #3: Open up the side seam and it will fit easily over your sewing arm. Then re-stitch and re-serge the seam.
me: Y’all are brilliant!

refashion: Mended clothes don’t have to look boring. This patch turned out most excellent! I’ll definitely be saving my denim scraps for future repairs.

my creative space

my creative space

In my creative space today I’m still thinking about sleeves. I’m not sure if I’m going to make a shirt from scratch or use these pattern pieces on an existing garment. Can’t. Stop. Thinking. About. Sleeves.

What creative things are you thinking about today? Don’t forget to check in on the great creative minds over at Kirsty’s blog.